A friend has asked for a copy of the Multi Pad files in the Tyros3. For this task, we'll show you how you can copy these files to a folder on your USB drive. From there you can move them to your PC, zip up the folder, and email the zip file. You could do the same thing, of course, with Tyros3 styles, but be aware that these will not play on earlier generation keyboards. The opposite is not true; you can play styles from earlier keyboards on the Tyros3 and the Tyros3 styles will work fine on the Tyros4 and Tyros5.
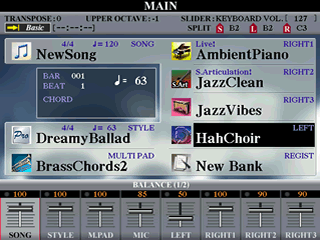 Here
we are at the MAIN screen with the DreamyBallad style
loaded. We want to get to the Multi Pads, so press the [E] button to open
the MULTI PAD display screen. Alternatively, on the keyboard panel, you could
press the [SELECT] key located in the MULTI PAD CONTOL section to open up
the MULTI PAD display screen.
Here
we are at the MAIN screen with the DreamyBallad style
loaded. We want to get to the Multi Pads, so press the [E] button to open
the MULTI PAD display screen. Alternatively, on the keyboard panel, you could
press the [SELECT] key located in the MULTI PAD CONTOL section to open up
the MULTI PAD display screen.
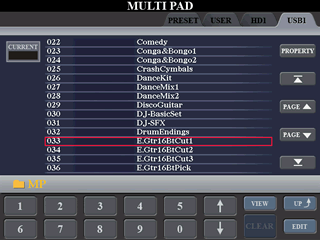
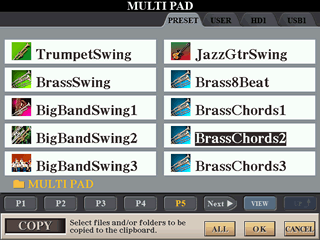 The MULTI
PAD screen opens up showing the currently select Multi Pad, BrassChords2.
Select the COPY option, which will open up the
COPY prompt box at the bottom of the screen asking you to select the files
and/or folders to be copied to the clipboard. All of the Multi Pads are in
the top-level "MULTI
PAD"
folder. In this screen shot, you are on the second page, P2. If you browsed
through all the pages, you would find that there are 123 preset Multi Pads
shown in 13 pages.
The MULTI
PAD screen opens up showing the currently select Multi Pad, BrassChords2.
Select the COPY option, which will open up the
COPY prompt box at the bottom of the screen asking you to select the files
and/or folders to be copied to the clipboard. All of the Multi Pads are in
the top-level "MULTI
PAD"
folder. In this screen shot, you are on the second page, P2. If you browsed
through all the pages, you would find that there are 123 preset Multi Pads
shown in 13 pages.
 You want
all of these files, but you don't want to go through and select them all
one by one. Fortunately, there is an ALL option
that you can choose. When you do, all of the files in the folder, in this
case, the top-level MULTI PAD folder, are selected. You can now select OK to
copy all of these files to the clipboard.
You want
all of these files, but you don't want to go through and select them all
one by one. Fortunately, there is an ALL option
that you can choose. When you do, all of the files in the folder, in this
case, the top-level MULTI PAD folder, are selected. You can now select OK to
copy all of these files to the clipboard.
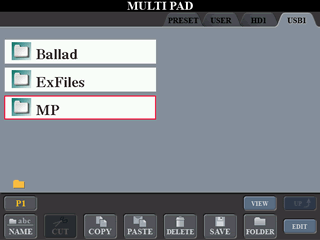
 You want
to move the files to the USB drive, so [TAB] over from the PRESET area to
the USB1 area. Continuing from our earlier examples, there are two folders
shown on the USB drive, Ballad and ExFiles. Instead
of pasting all of the Multi Pad files at the "root" level of the
drive, let's create a folder to put these files in. Select the FOLDER option
to create a new folder.
You want
to move the files to the USB drive, so [TAB] over from the PRESET area to
the USB1 area. Continuing from our earlier examples, there are two folders
shown on the USB drive, Ballad and ExFiles. Instead
of pasting all of the Multi Pad files at the "root" level of the
drive, let's create a folder to put these files in. Select the FOLDER option
to create a new folder.
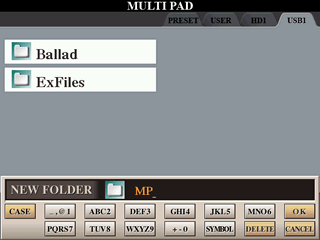 This
opens up the NEW FOLDER name input box with the default name of "NewFolder".
I deleted these characters by using the DELETE button
and replaced them with a simple "MP" name -- short, but still
descriptive -- and then pressed the OK button.
This
opens up the NEW FOLDER name input box with the default name of "NewFolder".
I deleted these characters by using the DELETE button
and replaced them with a simple "MP" name -- short, but still
descriptive -- and then pressed the OK button.
 The MULTI
PAD display screen now shows the new folder we just created as well as the
two previous folders. Select the new folder by pressing the [C] key, which
will automatically open the "MP" folder.
The MULTI
PAD display screen now shows the new folder we just created as well as the
two previous folders. Select the new folder by pressing the [C] key, which
will automatically open the "MP" folder.
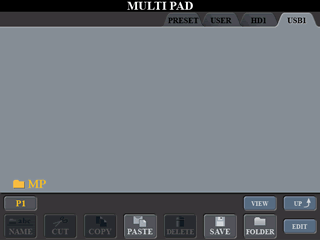 Since
this is a new folder, it is, of course, still empty. Notice, however, that
the PASTE option is available. That's because the Multi Pads we copied are
all still sitting on the clipboard. We complete the copy operation now by
selecting the PASTE option with the [4B] button.
Since
this is a new folder, it is, of course, still empty. Notice, however, that
the PASTE option is available. That's because the Multi Pads we copied are
all still sitting on the clipboard. We complete the copy operation now by
selecting the PASTE option with the [4B] button.
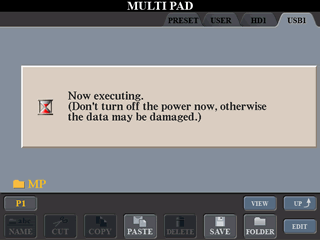 A message
pops up explaining that the paste operation is now underway and warning you
not to turn off the power while the keyboard is trying to write information
to your USB drive. Interrupting the process before it completes will mess
up the file directory and you may not then be able to get to your data.
A message
pops up explaining that the paste operation is now underway and warning you
not to turn off the power while the keyboard is trying to write information
to your USB drive. Interrupting the process before it completes will mess
up the file directory and you may not then be able to get to your data.
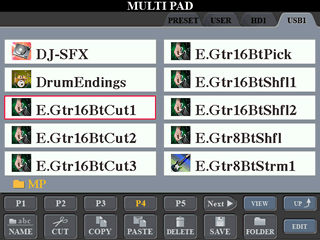 When
the paste operation is complete, the MULTI PAD display screen will now show
you all those Multi Pads in the "MP" folder on the USB drive. You
could check through some of the pages to see that all the files are there.
When
the paste operation is complete, the MULTI PAD display screen will now show
you all those Multi Pads in the "MP" folder on the USB drive. You
could check through some of the pages to see that all the files are there.
 Notice
that the VIEW option is also available from the MULTI PAD display screen.
Select this option and you will be able to more quickly assure yourself that
all the Multi Pads are there.
Notice
that the VIEW option is also available from the MULTI PAD display screen.
Select this option and you will be able to more quickly assure yourself that
all the Multi Pads are there.
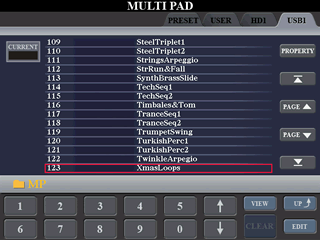 I pressed
the [J] button to jump to the end of the list. You can see that the cursor,
represented as a box drawn around the Multi Pad number and name, is now on
Multi Pad number 123, XmasLoops. You can press
the [ENTER] key to select this Multi-Pad.
I pressed
the [J] button to jump to the end of the list. You can see that the cursor,
represented as a box drawn around the Multi Pad number and name, is now on
Multi Pad number 123, XmasLoops. You can press
the [ENTER] key to select this Multi-Pad.
Note that a new EDIT option can be seen in this
View.
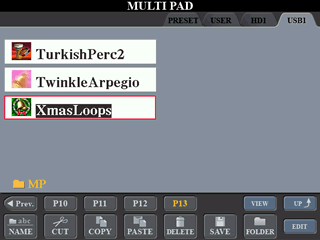 That EDIT option
is also available in the standard 10-file display screen shown here. Pressing
the VIEW option toggles between the two different
views. But what is it that you can edit? Let's find out. With the XmasLoops Multi
Pad selected, press the EDIT option.
That EDIT option
is also available in the standard 10-file display screen shown here. Pressing
the VIEW option toggles between the two different
views. But what is it that you can edit? Let's find out. With the XmasLoops Multi
Pad selected, press the EDIT option.
 This
opens up the MULTI PAD EDIT screen. Every Multi Pad file contains four individual
Multi Pads. Each of these can have a unique name. The MULTI PAD EDIT screen
displays the name for each of the four Multi Pads in the XmasLoops Multi
Pad file. You can select the NAME option and
change the names given to each Multi Pad if you like.
This
opens up the MULTI PAD EDIT screen. Every Multi Pad file contains four individual
Multi Pads. Each of these can have a unique name. The MULTI PAD EDIT screen
displays the name for each of the four Multi Pads in the XmasLoops Multi
Pad file. You can select the NAME option and
change the names given to each Multi Pad if you like.
 This EDIT option
is also available in the REGISTRATION display screen where you can view,
and edit, the names associated with the eight individual registration memory
buttons in a given registration bank. Editing the names in a registration
bank is more useful since these names will display on the MAIN screen when
you select one of the registration memory buttons. See the Registration lessons
for more details on registration memory files and buttons. I don't see where
the names of the Multi Pad buttons ever appear other than in this edit box.
This EDIT option
is also available in the REGISTRATION display screen where you can view,
and edit, the names associated with the eight individual registration memory
buttons in a given registration bank. Editing the names in a registration
bank is more useful since these names will display on the MAIN screen when
you select one of the registration memory buttons. See the Registration lessons
for more details on registration memory files and buttons. I don't see where
the names of the Multi Pad buttons ever appear other than in this edit box.
What's Next
OK, all of the preset Multi Pad files are now in this MP folder on your USB drive. You can now move your USB drive to your computer and zip up that folder. See the lesson on File Compression if you need help understanding how to zip or unzip a file. In the next lesson, we'll discuss how you would download files from the internet so that you can take advantage of all the free resources on this, and other, web sites.
This page updated on February 15, 2024 .