When you select a style, you automatically select a number of "instruments" that accompany you when you play. You have a drummer, a bass player, and most likely, a piano player and guitarist as well. The particular players, and the instruments they use, are built into the style selected. If you pick a ballad style, you get appropriate instruments to accompany a ballad. If you pick a March style, you get instruments to accompany a March.
 But
what about the instrument you are going to play? The keyboard has
a RIGHT1 voice, and optionally, a RIGHT2 or RIGHT3 voice, that you can select for your right hand. You can also select, if you
want,
But
what about the instrument you are going to play? The keyboard has
a RIGHT1 voice, and optionally, a RIGHT2 or RIGHT3 voice, that you can select for your right hand. You can also select, if you
want,  a
different voice for your left hand. But there are literally hundreds of voices
to choose from. Just because your keyboard looks like a piano, you don't
have to select a piano. As you saw from the Preset Voices lesson, you could
become a sax player, or a guitarist, or a fiddler.
a
different voice for your left hand. But there are literally hundreds of voices
to choose from. Just because your keyboard looks like a piano, you don't
have to select a piano. As you saw from the Preset Voices lesson, you could
become a sax player, or a guitarist, or a fiddler.
Over time, you will become familiar with the host of voices available and you will discover your favorites. But starting out, you don't have to worry about picking out appropriate voices. Your Yamaha keyboard has already done that for you. Every time you select a style, the keyboard loads appropriate right and left-hand voices to go along with that style. In fact, for each of the four variations included in a style, there can be different voices used for the right hand instruments. These voices are called up using the One-Touch Setting (OTS) feature of your keyboard. All of the Yamaha PSR and Tyros keyboards since the PSR-2000 include this feature. Let's see how that works.
OTS Buttons
![]() On
the right side of the keyboard, look for a group of buttons labeled ONE
TOUCH SETTINGS. There are four buttons, labeled 1 2, 3, and 4. There is
a light above the button, or in the button, or the button itself is lighted
depending on your keyboard. The OTS
buttons may look a little different on the different model keyboards, but they always
do the same thing.
On
the right side of the keyboard, look for a group of buttons labeled ONE
TOUCH SETTINGS. There are four buttons, labeled 1 2, 3, and 4. There is
a light above the button, or in the button, or the button itself is lighted
depending on your keyboard. The OTS
buttons may look a little different on the different model keyboards, but they always
do the same thing.
With a style loaded, try pushing each of those OTS buttons and watch what happens to the voices in the MAIN or HOME window. If you are not right next to your keyboard at the moment, you can simulate that button pushing in the illustration below showing the Tyros3 MAIN screen with the EasyPop style selected.
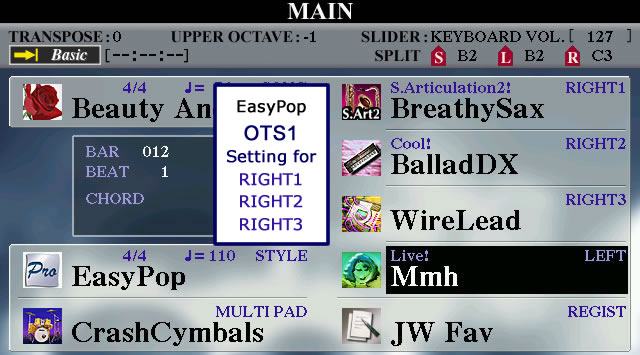
| Press any of the OTS buttons shown here and watch the screen above to see the impact on voices -----> |
As you press the different OTS buttons, you see that the three right-hand voices (RIGHT1, RIGHT2, and RIGHT3) change. The LEFT voice does not change. The LEFT voice is part of the style itself, in this case, EasyPop, and not part of the OTS. In future lessons you will see how you can modify the style to change the "default" LEFT voice in that style. You will also learn how to set a different left-hand voice and then FREEZE the left-hand voice so that it does not change as you select different OTS settings.
OTS INFORMATION Screen
A separate screen is available to provide you information on all four OTS settings. How you access the screen is different on the PSR-SX900 (and Genos) than on the earlier PSR and Tyros models.
On the PSR-SX900
The simplest way to see the OTS Information screen is to press the [Direct Access] button and one of the OTS buttons. This opens up a Style Information screen. It shows the style name, time signature, and tempo, just like on the Home page. It also shows the One Touch Setting Data for all four voices. Voices that are not ON, are dimmed.

![]() You can also get to this style information from the Style selection screen. Note that there are additional style options on the top right corner of that screen. The "X" is, of course, for closing the screen. The Search and File Options are discussed in later Lessons. Here, we look at that Menu option. Touch the Menu option to open a dialog box of additional style screens:
You can also get to this style information from the Style selection screen. Note that there are additional style options on the top right corner of that screen. The "X" is, of course, for closing the screen. The Search and File Options are discussed in later Lessons. Here, we look at that Menu option. Touch the Menu option to open a dialog box of additional style screens:

The Style Information button takes you to the screen shown above. You have already encountered the Split & Fingering screen as well as the Mixer screen in earlier lessons.
On the PSR and Tyros
 Normally,
to see what voices are selected in each of the OTS buttons, you have to cycle
through each of the buttons and watch the MAIN screen to see the voices.
But a new style feature was introduced on the Tyros3 and continued in
the new PSR-S910 and subsequent models. Open the STYLE selection screen and notice that
one of the choices on
the bottom of the screen is OTS INFO. Select any style and then open the
OTS INFORMATION screen by pressing the upper [5] button to choose the OTS
INFO option.
Normally,
to see what voices are selected in each of the OTS buttons, you have to cycle
through each of the buttons and watch the MAIN screen to see the voices.
But a new style feature was introduced on the Tyros3 and continued in
the new PSR-S910 and subsequent models. Open the STYLE selection screen and notice that
one of the choices on
the bottom of the screen is OTS INFO. Select any style and then open the
OTS INFORMATION screen by pressing the upper [5] button to choose the OTS
INFO option.
The result for the EasyPop style is shown in the screen illustration below.
The voices are exactly the same as you saw on the MAIN screen when
pressing the OTS buttons in the illustration above. Note that while a voice
is identified for R1, R2, R3, and L, in each of the OTS settings, not all
of the voices are ON. Voices that are not turned ON are shown in a lighter
font.  (On
your keyboard panel, the PART ON/OFF button for voices that are ON is lighted;
the light is OFF for voices that are not ON.)
(On
your keyboard panel, the PART ON/OFF button for voices that are ON is lighted;
the light is OFF for voices that are not ON.)
For example, in OTS1, only the R1 voice (BreathySax) is ON. The BalladDX electric piano is set as the R2 voice, but it is not initially ON. You could, of course, turn OFF R1 and turn ON R2 using the PART ON/OFF buttons. You would then be playing the BalladDX in your right hand.
In the second OTS setting, both R1 (ConcertGrand) and R2 (DarkFatSaw) are ON. In OTS3, a ConcertGuitar in R1 is ON, but you could, alternatively, choose to play an organ (CurvedBars) in R2 or the Jazz/Trumpet in R3. Finally, in OTS4, two string voices, ConcertStrings (R1) and Allegro (R2), are combined when you play the melody.
Note that the left hand voice is the same in all the OTS choices and it is OFF. Yamaha usually sets the left-hand voice to OFF in the preset styles.
When you press one of the OTS buttons, this not only sets up the voices on your keyboard, it also automatically turns on SYNC START. Wtih SYNC START set to ON, as soon as you play a note in the auto accompaniment section, the style starts playing.
OTS LINK
![]()
 In the STYLE CONTROL section is a button labeled OTS LINK. We mentioned
earlier that each style is designed with four, increasingly complex, style
patterns (A, B, C, and D). Each style also includes four OTS variations (1,
2, 3, and 4). The OTS settings are often chosen to match not only the style,
but the variation as well. Thus, you may want to use OTS1 along with the
A variation, OTS2 with the B variation, OTS3 with the C variation,
and OTS4 with the D variation. There is no requirement to do this and
you could mix and match the variations and the OTS settings however you want.
But, if you do want to link the OTS settings with the variations,
then you would use the OTS LINK button. When the OTS LINK option is ON, whenever
you select a different style variation, the keyboard automatically switches
to the OTS setting that matches that variation.
In the STYLE CONTROL section is a button labeled OTS LINK. We mentioned
earlier that each style is designed with four, increasingly complex, style
patterns (A, B, C, and D). Each style also includes four OTS variations (1,
2, 3, and 4). The OTS settings are often chosen to match not only the style,
but the variation as well. Thus, you may want to use OTS1 along with the
A variation, OTS2 with the B variation, OTS3 with the C variation,
and OTS4 with the D variation. There is no requirement to do this and
you could mix and match the variations and the OTS settings however you want.
But, if you do want to link the OTS settings with the variations,
then you would use the OTS LINK button. When the OTS LINK option is ON, whenever
you select a different style variation, the keyboard automatically switches
to the OTS setting that matches that variation.
AUTO FILL-IN
![]() A "FILL" is a short drum phrase to add variation to the style. There
is a button located in the STYLE CONTROL section marked AUTO FILL IN. When
you turn the AUTO FILL IN feature ON, the fill will play automatically as
you switch from one variation to the next. When a variation is playing,
if you press that variation button again, you will trigger the fill-in phrase. Turn
the FILL-IN feature OFF and press the START/STOP button to start a style
playing. You can turn off ACMP and just listen to the drum pattern. Now press
the 4 variation buttons, A to D, one at a time and listen to the style rhythm
pattern change as you go from one variation to the next.
A "FILL" is a short drum phrase to add variation to the style. There
is a button located in the STYLE CONTROL section marked AUTO FILL IN. When
you turn the AUTO FILL IN feature ON, the fill will play automatically as
you switch from one variation to the next. When a variation is playing,
if you press that variation button again, you will trigger the fill-in phrase. Turn
the FILL-IN feature OFF and press the START/STOP button to start a style
playing. You can turn off ACMP and just listen to the drum pattern. Now press
the 4 variation buttons, A to D, one at a time and listen to the style rhythm
pattern change as you go from one variation to the next.
Now, turn the AUTO FILL IN feature ON and repeat the above exercise so you can hear what the fill-in sounds like as you go from one style variation to the next. With AUTO FILL IN turned ON, you can cancel the fill-in feature if you press the next style section button twice quickly. In addition, you can trigger the fill in for the current style section by pressing that section button while the style is playing. Try that out. Press the [B] button for the MAIN B variation and, while the rhythm is playing, press [B] again and you'll hear the fill-in phrase added.
Finally, in the next lesson, we'll see how you can put all this information together so you can start playing your own songs.
This page updated on February 15, 2024 .