The main display screen is your central control panel. It shows you how your keyboard is currently configured -- what voices you will hear when you play the keys, what style is loaded, what the tempo is, what voices are on or off. You decide how your keyboard is setup. You can select a different style, put whatever voices you want for your right hand and your left hand, change the tempo, and so forth.
The PSR-SX900/700 and the Genos models use a new touch-sensitive "HOME" screen to display the current configuration and to make changes. Earlier models use a "MAIN" screen that is accessed by using buttons on the left and right side of that screen. The new "HOME" screen is discussed below. If you have an earlier Tyros or PSR model, jump to the discusion of the "MAIN" screen.
PSR-SX900/SX700 HOME Screen
The HOME screen for the PSR-SX900 is shown below. It is similar to the HOME screen on the Genos and works in a similar manner. This is a touch-screen. There are no buttons on the left or right side of the screen as in earlier models. The user makes a selection by touching the relevant part of the screen. In earlier models, this initial screen was called the MAIN screen. (Click on the picture for a larger view.)
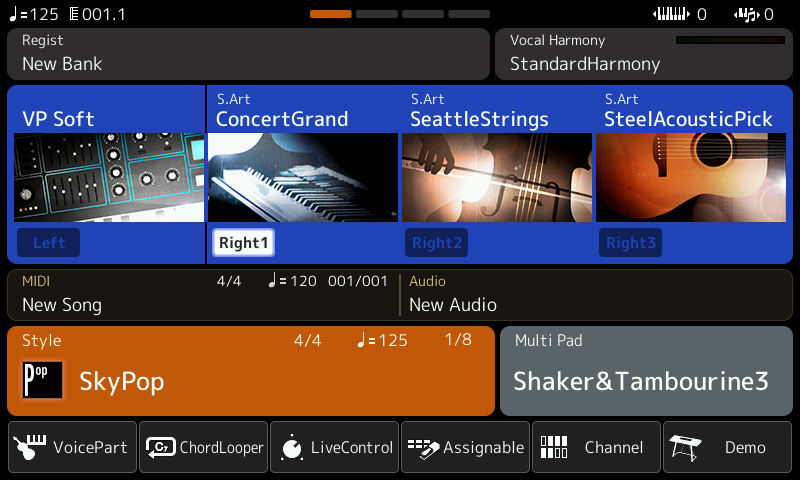
When you turn on your keyboard, the default style (SkyPop in the PSR-SX900 and Cool8Beat in the Genos) is automatically loaded as well as the voices used with that style. The voices are shown in a row of 4 instrument pictures with the voice part under the picture and the selected instrument above the picture. In the illustration above the "Right1" part is highlighted indicating that the Right1 voice is ON. The other voice parts are currently OFF. The instrument for the Right1 Part is "S.Art ConcertGrand." If you played any of the keys right now, you would here that Concert Grand piano voice.
Selecting a new voice
![]() If you want to use a different instrument for the Right1 voice, touch the picture of the ConcertGrand piano or the instrument name above the picture. That brings up a new screen, the "Right1 Voice" screen that shows you the various voice categories and voices available in each category. The currently selected voice is highlighted. Whenever you are selecting a new instrument, a voice screen like the one below is loaded.
If you want to use a different instrument for the Right1 voice, touch the picture of the ConcertGrand piano or the instrument name above the picture. That brings up a new screen, the "Right1 Voice" screen that shows you the various voice categories and voices available in each category. The currently selected voice is highlighted. Whenever you are selecting a new instrument, a voice screen like the one below is loaded.
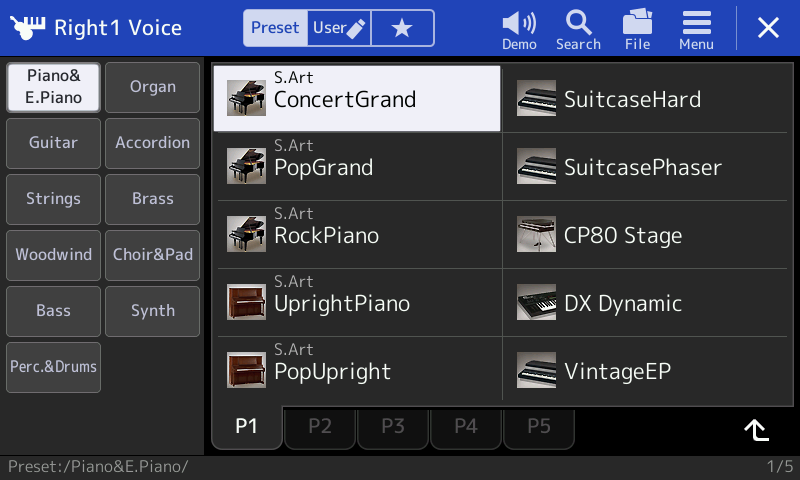
There are 11 different categories of voices available. These are listed in the left-hand panel where the "Piano&E.Piano" category is highlighted. The available voices in this category are shown in the right-hand panel. Voices are listed via a series of "pages" that display 10 voices at a time. The "ConcertGrand" voice is on the first page (P1) and it is highlighted indicating that it is the currently selected voice for Right1. Additional voices are listed on subsequent pages ("P2" ... "P5"). Touch the page numbers to see the voices on that page. Touch the voice categories to see voices available in that category. Touch any voice to select that voice as your Right1 voice.
![]() Note that "Preset" is highlighted at the top of the screen. Voices in the "Preset" area are built into your keyboard and they are always available. You can not delete or modify any of the Preset voices. However, you can load a preset voice, make changes to the voice, and then SAVE that voice in the "User" area. Pressing the "User" button next to "Preset" takes you to voices you may have created or downloaded and stored in the "User" area or on a USB1 drive. The "star" button is where you can list your favorite voices for easy retrieval.
Note that "Preset" is highlighted at the top of the screen. Voices in the "Preset" area are built into your keyboard and they are always available. You can not delete or modify any of the Preset voices. However, you can load a preset voice, make changes to the voice, and then SAVE that voice in the "User" area. Pressing the "User" button next to "Preset" takes you to voices you may have created or downloaded and stored in the "User" area or on a USB1 drive. The "star" button is where you can list your favorite voices for easy retrieval.
![]() Note the "X" button in the upper right-hand corner. Touch this button to close the Right1 Voices screen and return to the HOME screen. There will be additional discussion on the Voice (and Style) selection screens in upcoming lessons.
Note the "X" button in the upper right-hand corner. Touch this button to close the Right1 Voices screen and return to the HOME screen. There will be additional discussion on the Voice (and Style) selection screens in upcoming lessons.
Turning Voices On or Off
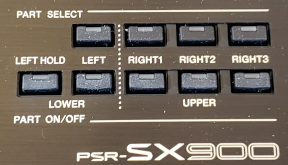 You can turn the various voices ON or OFF by touching the part buttons (Left, Right1, Right2, Right3) below each picture. These buttons are much smaller than the pictures of the instruments and can be harder to "touch". But, you can also turn these voices on or off by using the PART ON/OFF buttons on the keyboard. Similarly, you can use the PART SELECT buttons on the keyboard to go directly to the voice screen and select a different voice.
Using the One Touch Setting
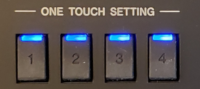 The One Touch Setting (OTS) buttons on your keyboard immediately call up appropriate panel settings for each style, which include the three right-hand voices. Initially, the OTS1 button is highlighted and the voices in that setting are shown on the HOME screen. Press any of the other three OTS buttons and watch the voices change on that HOME screen. The HOME screen does not indicate which OTS button is active, but the buttons on your keyboard tell you that.
Selecting a Different Style
![]() If you want to select a new style, you can touch the style shown in the HOME screen (SkyPop) and that brings up a new "Style" screen showing you available style categories. You could also get to a different style by pressing any of the Style category buttons on your keyboard and that takes you immediately to the preset styles available in that category.
If you want to select a new style, you can touch the style shown in the HOME screen (SkyPop) and that brings up a new "Style" screen showing you available style categories. You could also get to a different style by pressing any of the Style category buttons on your keyboard and that takes you immediately to the preset styles available in that category.
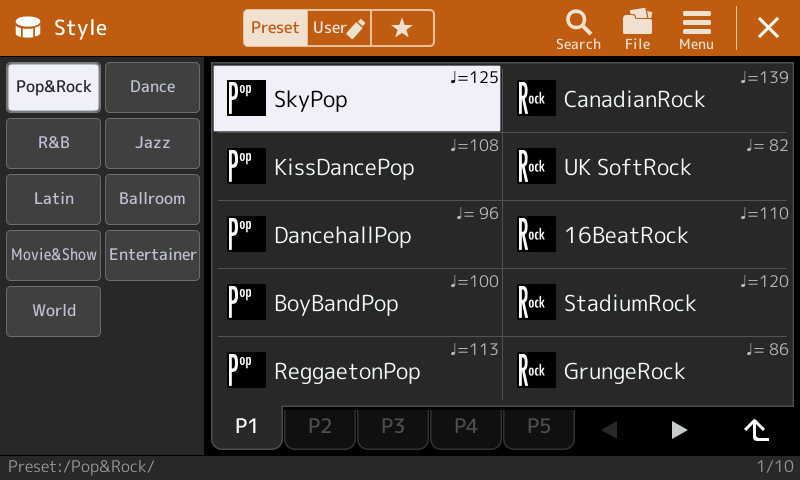
Navigating through the available style categories and styles is just like navigating through the available voices. The style categories are listed on the left and each page of the available styles in that category are shown on the right. Touch the page numbers ("P1", ... "P5") at the bottom of the screen to see the styles on that page. To select any style, simply touch the style name.
The highlighted "Preset" shows you are looking at the preset styles available in the keyboard. The "User" area is where you would find styles in the keyboard's User area as well as on any USB drive attached to your keyboard. The "X" button closes this "Style" screen and takes you back to the HOME screen.
Navigating the options with a touch-screen often requires not only touching elements on the screen but also touching physical buttons on the keyboard. The details on working with this touch-screen are explored in future lessons. Before doing that, you may want to try out some of the "demo" songs that come with your keyboard. Accessing the demos are explained in the next lesson.
MAIN Screen for PSR, PSR-S, and Tyros Models.
On earlier Yamaha arranger keyboards, you communicate what you want by using the button controls on the left and right side of the display screen as well as the buttons at the bottom of the screen. Subsequent lessons will refer to these control buttons so let's take a look at them right now.
 Here is a photo of the MAIN display screen for the Yamaha PSR-S975 arranger keyboard. The layout of this screen, as well as the style and voice buttons on the top of the keyboard are the same as in the previous PSR-S970 and PSR-S950 keyboards.
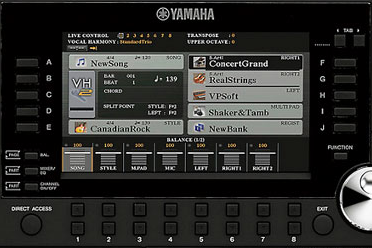
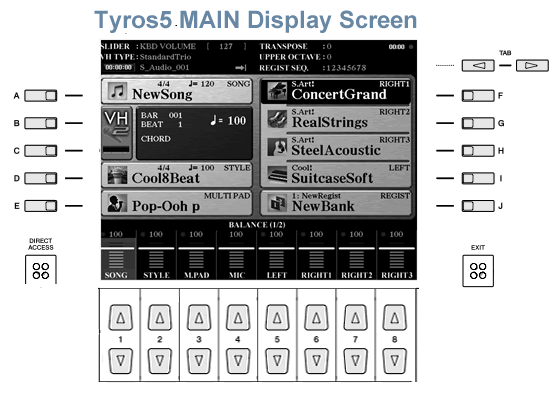
The illustration below shows the MAIN display screen for the Tyros5, which is similar on the Tyros4 and Tyros3. There are slight differences between the Tyros screens and the PSR-S screens since the Tyros models include a third right-hand voice not available on the PSR-S models. You will note that the 10 primary control buttons, labeled [A] ... [E] on the left side of the screen and [F] ... [I] on the right side of the screen, are the same on all of the Yamaha keyboards. Similarly, at the bottom of the screen are 16 buttons, in two rows of 8, the top row with an upward facing arrow and the bottom row with a downward facing arrow.
Left and Right Buttons
In the center of the screen, all the models display a table with two columns and 5 rows. The column on the left is associated with the buttons [A] ... [E] and the column on the right with the buttons [F] ... [J].
Button [A] is next to the SONG cell, which indicates the curently loaded midi song. On the top right, next to the [F] button is the RIGHT1 cell indicating the first right-hand voice, a ConcertGrand piano in the illustration.
The table below shows you, model by model, what each side button controls. The SONG cell is always next to the [A] button and the RIGHT1 and RIGHT2 voices are always next to the [F] and [G] buttons respectively. However, design changes over time have repositioned some of the other regular cells, particularly the STYLE cell. In various illustrations, we may refer to the display screen for the Tyros3 and particular buttons on the left or right. Your particular keyboard, however, may have the referenced cell positioned next to a different button. Bear this in mind as you work through the lessons.
| LEFT SIDE | S975-S970 | S950-S910 | S900 | 3000 | Tyros5/4/3 | Tyros2 |
|---|---|---|---|---|---|---|
| [A] | SONG | SONG | SONG | SONG | SONG | SONG |
| [B] | BAR BEAT | BAR BEAT | BAR BEAT | STYLE | BAR BEAT | BAR BEAT |
| [C] | CHORD | CHORD | TEMPO | CHORD | CHORD | STYLE |
| [D] | SPLIT POINT | TRANSPOSE | STYLE | MULTIPAD | STYLE | IDC-chord |
| [E] | STYLE | STYLE | CHORD | INTERNET | MULTIPAD | MULTIPAD |
| RIGHT SIDE | S975-S970 | S910-S900 | S900 | 3000 | Tyros3 | Tyros2 |
| [F] | RIGHT1 | RIGHT1 | RIGHT1 | RIGHT1 | RIGHT1 | RIGHT1 |
| [G] | RIGHT2 | RIGHT2 | RIGHT2 | RIGHT2 | RIGHT2 | RIGHT2 |
| [H] | LEFT | LEFT | LEFT | LEFT | RIGHT3 | RIGHT3 |
| [I] | MULTI PAD | MULTI PAD | MULTI PAD | SPLIT POINT | LEFT | LEFT |
| [J] | REGIST | REGIST | REGIST | REGIST | REGIST | REGIST |
Bottom Buttons (1-8)
Below the display screen are two rows of buttons numbered [1] ... [8]. These buttons are used to select options shown in the bottom part of the screen. Different screens will have different options at the bottom.
 For the MAIN screen, the bottom two rows show the Sound Balance controls, which allow you to adjust the sound volume of individual components of the keyboard. For example, lower the sound of the STYLE section while increasing the sound of the RIGHT1 voice. For the PSR-S975 shown here, the STYLE volume is above the [2] buttons. Pressing the upper [2] button increases the sound and pressing the lower [2] button reduces the sound of the STYLE section. To change the RIGHT1 voice volume you would use the [6] buttons. Only 7 or the available 8 buttons are needed to adjust the various sound balances on the PSR-S models.
 The Tyros models also have 8 buttons at the bottom as shown in this view of the Tyros5. Since the Tyros5 has a RIGHT3 voice, it uses all 8 buttons at the bottom for adjusting sound Balance. In addition to the upper and lower buttons to move the sound up or down, the Tyros models also have 8 slider controls. You can also use the slider controls to increase or decrease the various sound volumes. Another major difference on the Tyros models is that the screen does not stay flat in the keyboard; it can be tiled up for easier viewing of the screen contents.
When you are viewing other screens, for example the STYLE screen that is used to display all the styles available, the [A], [B], ..., [J] buttons are used to select one of 10 shown styles. The buttons at the bottom of the screen are used to select different "pages" of 10 styles and to perform style operations such as copying a style or renaming the style. Details are explained in future lessons as more aspects of your keyboard are covered.
TAB Buttons
Some display screens may involve multiple major components that are indicated by folder-type tabs at the top of the screen. For example, your keyboard contains internal PRESET styles that are always available. But you may also have some styles stored in a separate USER area within the keyboard, on a USB flash drive, or, if you have a hard drive, on the hard drive itself (HD1). Each of these major storage areas would be represented by a separate tab and you would use the two "TAB" keys located at the top and to the right of the main display. These tab keys, sometimes labeled [PREV] and [NEXT] are used to move from one tab area to the next. Again, you will see many examples of this as you read through these lessons.
EXIT Button
An [EXIT] button is located usually on the right and below the main display screen. When you choose options, a new display screen opens where you can make additional choices. Some of these choices may open yet another display screen. The [EXIT] button is used to close the current display screen and move you back to the previous screen. The top screen is the MAIN screen you see pictured above. Pressing [EXIT] repeatedly will always get you back, eventually, to the MAIN screen.
DIRECT ACCESS Button
Note also a button marked [DIRECT ACCESS], usually located on the lower left-hand portion of the controls. You can use this button together with other buttons on the keyboard to immediately jump to a particular option screen. You'll see examples of this in several of the lessons.
Now that you've had a good look at your keyboard top (and back) panels as well as the main screen, it's time to hear some of the sounds that your keyboard can produce. We'll do that in the next lesson when we try out some of the demos included in your keyboard. In working with the demos, you'll also get a good introduction to how those display screen controls work.
This page updated on February 15, 2024 .