Style Control Panel
All of the keyboards have a section on the left side of the top panel called STYLE CONTROL. It includes a series of buttons that control how the style plays.
Each style has four different MAIN variations. There is a button for each variation that allows the player to move quickly from one variation to the next. The variations, labeled A, B, C, and D, generally increase in complexity as you go from variation to variation.
Each style has three INTRO buttons and three ENDING buttons. Like the variations, the complexity of the intro and of the ending increases from the 1st option to the 3rd.
Finally, there are a group of buttons to start or stop the style and a group of buttons that deal with the accompaniment.
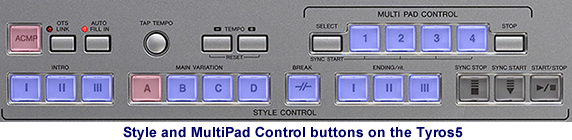
For the most part, the style control buttons have been the same for Yamaha keyboards over many generations. The Style Control buttons for the PSR-SX900 are shown below:

The positioning of the individual buttons may be different on your keyboard, but all of these buttons will be there. The Style Controls on several earlier keyboards, the PSR-S900/S910, the PSR-S950 and the Tyros5 are shown below.

Let's see what some of these style controls bottons do.
START/STOP - On the far right of this section is the START/STOP button that is used to start (and stop) the style. If you press this button, the rhythm section starts and the light by this button will flash in sync with the tempo of the drum beat. The drum beat and pattern varies depending on the style selected.
SYNC START - Right next to the START/STOP button is SYNC START. This button can be used to start the style playing as soon as you finger a chord on the keyboard. When you press SYNC START, it lights up and the START/STOP button flashes indicating everything is ready to start on your signal.
ACMP - This button, located on the left side of the style controls, turns the accompaniment feature on and off. Usually, there will be a light (either next to the button or in the button itself) that indicates when ACMP is ON. With the accompaniment on, other voices join the rhythm section in accompanying you. To do that, the keyboard needs to know which chord to play. So, until you indicate the chord, you won't hear any other voices playing. More on that in the next lesson.
INTRO - All the styles have three possible INTROs ([I],
[II], and [III]), that is, a musical phrase or passage that you can use to introduce
your song. The simplest is Intro I and the most complex is Intro
III. All the keyboards from the Tyros on included three individual buttons
for these intros like those shown in the photos above.
MAIN - The four main variations in the style are triggered by the four buttons [A], [B], [C], and [D]. The simplest variation is usually the first button, [A]. As you progress through the variations to [D], the accompaniment pattern changes, usually by adding more instruments and more notes. You may encounter "external" styles, particularly those from earlier keyboards, that do not include all four variations. In these cases, the buttons for variations that are not used will not be lighted. A green light means that section has style data and can be played. A red light means that section is playing (or will be playing when accompaniment is started).
ENDING/rit - You will also see three ending buttons on all the keyboards. Like the Intros, the end of the song can be very simple [I], or more complex [III]. The "/rit" you see above the ending buttons stands for "ritardando", that is, to gradually slow down. You trigger this effect by pushing the ending button a second time while the ending is playing. This causes the ending to gradually slow the tempo as the song ends.
BREAK - This buttons lets you add dynamic breaks to the rhythm part of the style.
Style Channels
The buttons above can start and stop a style and play different versions of a style. But what exactly is in a style? A style provides the accompaniment that enables you to sound like a one-man band. The style is composed of 9 channels. The first two are reserved for rhythm instruments, like drums. The next six are for musical instruments. The last channel is for Audio. How you access (and modify) the individual style channels is very different for the PSR-SX900 (and Genos) compared to the earlier Tyros/PSR models. We'll look at the accompaniment of the SX900 first. Jump down to the following section if you have one of the earlier keyboards.
Style Accompaniment Voices on PSR-SX900
To explore the accompaniment voices, I loaded the Latin BossaBrazil style. The Home page looked like the screen shot below. You can see that this style starts out with a S.Art Saxophone in Right1. But you cannot see anything about what accompaniment instruments are in this style.
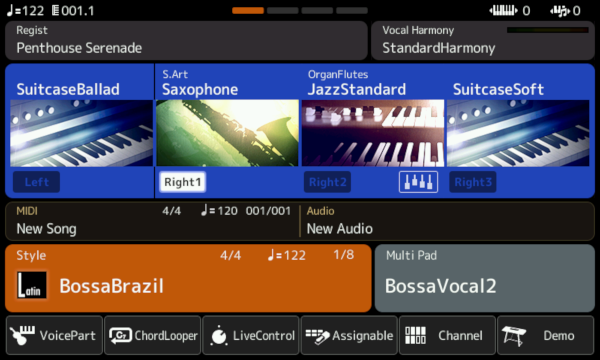
Notice at the bottom of this Home screen 6 buttons. The buttons above were initially assigned when my keyboard first arrived. However, these are "assignable" buttons. That means you can put your own options here to quickly load screens that you use frequently.

 The 5th button is labeled "Channel". If you don't see the button on your Home page, press the MENU button. "Channel" is one of the options in Menu1. Touch this option from the Home screen or from Menu1 and the Channel On/Off screen appears. The 9 Style channels are shown below 16 available Song channels. The Song channels are for MIDI songs. Here, we focus on the Style channels.
Each of the 9 style channels displays a picture of the instrument in that channel below the channel name. If an instrument is playing, a light by the instrument picture will be on. The first two channels, Rhythm1 and Rhythm2, are for instruments in a drum kit. If ACMP is on and you start a style, you will here these two tracks even if no chord is specified. When you do specify a chord, the other 7 channels (Bass, Chord1, Chord2, Pad, Phrase1, Phrase2, and Audio) kick in.
Turning Channels On and Off
You do not have to use all the channels. By touching the channel name, you can turn off (or turn on) that channel. In the illustration below, the last 4 channels are no longer playing.

Turning off channels is also a useful technique to isolate the sound of any one instrument. For example, if you want to check out only Chord 1 and the rhythm, turn of everything but these channels:
 The Chord1 instrument shows a picture of a guitar, but what guitar? Touch the picture to open the voice screen and see what Guitar is part of this style. The current voice is the NylonGuitar Megavoice. While the style is playing with only the rhythm and the Chord1, you can touch any of the other Megavoice guitar voices and immediately hear the impact on the style. I selected FlamencoGuitar and that changed the voice stored in that Chord1 channel.
Adjusting Style Volume
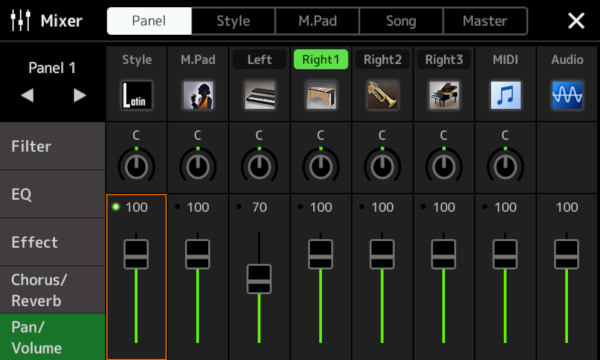
![]() When you play a song, the accompaniment voices in the style will sound along with your right and left-hand voices and the multipads if they are on. If you find the style is too loud or too soft for your other voices, how do you adjust it? You go to the Mixer screen. That option is not initially on the Home screen although you can assign it to one of the unassignable buttons. Otherwise, press the Menu button and Mixer will be the first choice in Menu1. There are 5 tabs at the top of this screen. Panel is highlighted in the screen shot below. This screen is used to adjust the balance between the Style, M.Pad, Left Voice, Right Voices, MIDI, and Audio. To adjust the volume, make sure the Pan/Volume option is selected. Under the Style column touch the slider shown. When it is selected a box will appear around the slider. You can move the volume up or down by touching the slider and moving your finger up or down. Or you can use the dial to move the volume up or down.
When you play a song, the accompaniment voices in the style will sound along with your right and left-hand voices and the multipads if they are on. If you find the style is too loud or too soft for your other voices, how do you adjust it? You go to the Mixer screen. That option is not initially on the Home screen although you can assign it to one of the unassignable buttons. Otherwise, press the Menu button and Mixer will be the first choice in Menu1. There are 5 tabs at the top of this screen. Panel is highlighted in the screen shot below. This screen is used to adjust the balance between the Style, M.Pad, Left Voice, Right Voices, MIDI, and Audio. To adjust the volume, make sure the Pan/Volume option is selected. Under the Style column touch the slider shown. When it is selected a box will appear around the slider. You can move the volume up or down by touching the slider and moving your finger up or down. Or you can use the dial to move the volume up or down.
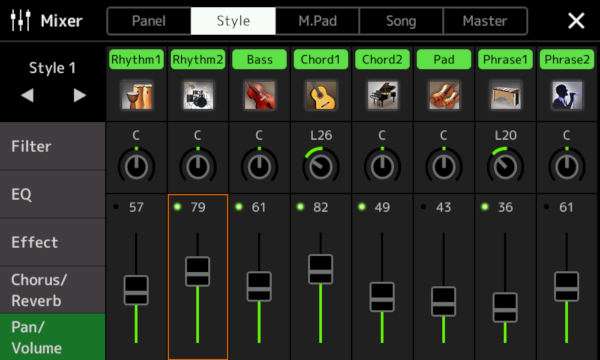
Touch the Style tab at the top of the Mixer screen to display the accompaniment channels. From here you can adjust the volume of any of the accompaniment channels. In this illustration, the Rhythm2 channel is selected and the slider can be moved to adjust the drum volume relative to the other accompaniment voices.
Well, you now have some idea on how you might adjust a style. But to get the style playing in the first place, you need to indicate what chord is needed as you play through your song. The next lesson covers how you specify chords on your keyboard.
Style Accompaniment Voices on Tyros/PSR
 When
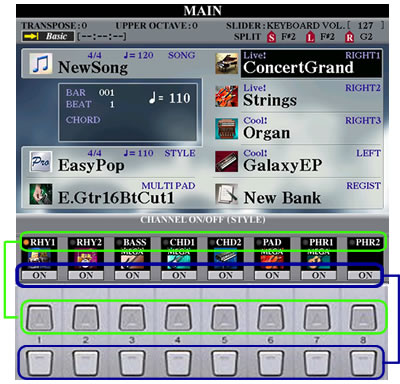
you start out, the MAIN screen shows you the style selected, initially EasyPop on the Tyros3. Each style can have up to 8 instruments included in the style settings.
When
you start out, the MAIN screen shows you the style selected, initially EasyPop on the Tyros3. Each style can have up to 8 instruments included in the style settings.
![]() Look for the button
on your panel labeled "CHANNEL ON/OFF". It will be located close to a button labeled "BALANCE" (see the illustration below for the S950.) Press the CHANNEL ON/OFF button and the
bottom part of the MAIN screen changes to show you the CHANNEL information
for the current SONG loaded or for the current STYLE loaded. (Press that button to move from one to the other.)
For now, we'll ignore the SONG channels, so move to the STYLE channels. The BALANCE button takes you back to the display showing the sound balance for the various keyboard parts.
Look for the button
on your panel labeled "CHANNEL ON/OFF". It will be located close to a button labeled "BALANCE" (see the illustration below for the S950.) Press the CHANNEL ON/OFF button and the
bottom part of the MAIN screen changes to show you the CHANNEL information
for the current SONG loaded or for the current STYLE loaded. (Press that button to move from one to the other.)
For now, we'll ignore the SONG channels, so move to the STYLE channels. The BALANCE button takes you back to the display showing the sound balance for the various keyboard parts.
The illustration below show the bottom buttons on the PSR-S950. The setup is the same on the S970 and the S975. The bottom two rows of the MAIN screen are initially showing the BALANCE controls. These show up when you press the BALANCE button shown on the left side of the image here. The CHANNEL ON/OFF button is also on the left right under the MIXING CONSOLE button. Press the CHANNEL ON/OFF button to switch the display to the style CHANNEL options.

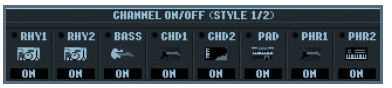 The STYLE channel display shows eight style channels. The first two
(RHY1 and RHY2) are the rhythm channels that contain the drum and percussion
patterns. The third channel is BASS, which uses appropriate bass voices
to match the style. CHD1 and CHD2 provide the rhythmic chord backing and
usually contain piano or guitar voices. Channel 6, PAD, is used for sustained
instruments such as strings, organ, choir, etc. The last two channels (PHR1
and PHR2) are used to add more interest to the accompaniment with things
like arpeggio chords or brass stabs. A style may not include all of these
channels. In the EasyPop style, for example, there is nothing in the PHR2
channel.
The STYLE channel display shows eight style channels. The first two
(RHY1 and RHY2) are the rhythm channels that contain the drum and percussion
patterns. The third channel is BASS, which uses appropriate bass voices
to match the style. CHD1 and CHD2 provide the rhythmic chord backing and
usually contain piano or guitar voices. Channel 6, PAD, is used for sustained
instruments such as strings, organ, choir, etc. The last two channels (PHR1
and PHR2) are used to add more interest to the accompaniment with things
like arpeggio chords or brass stabs. A style may not include all of these
channels. In the EasyPop style, for example, there is nothing in the PHR2
channel.
The two rows of 8 numbered buttons below the screen are used to turn the 8 individual style parts on or off and to display and/or change the instruments used in the style. The bottom row of buttons turn the part ON or OFF. The top row of buttons show the exact instrument used for that part. In a later lesson we'll talk more about how you can actually change the voice used in that part of the style and thus alter the sound of the style itself. For now, just be aware that styles can include up to 8 different voices. As you audition some styles in a little bit, remember that you can always pull up the CHANNEL ON/OFF display and turn individual parts OFF. This can have a dramatic impact on how the style sounds. Feel free to experiment with these ON/OFF buttons for individual styles.
OK, so now you're ready to try out these styles. The next step is to tell your Yamaha keyboard what chord you are playing so the style can accompany that chord. We mentioned earlier that your left-hand can play a chord in the left-hand side of the keyboard. The next lesson will discuss the various "fingering" options you can use to signify what chord you want your "band" to be playing.
This page updated on February 15, 2024 .