Below are some step-by-step instructions for those interested in making a multi track recording on their Yamaha or Tyros keyboard.
Record the Initial Song
Press the [REC] and [PLAY/PAUSE] buttons at the same time.
The led's for [REC] and [PLAY] will flash in red. This means that the recorder is ready and waiting.
Be sure you your keyboard is set up for the correct style and the voices you want to use are set for the RIGHT1, RIGHT2, (RIGHT3 if you have a Tyros) and LEFT voices.
You can now start playing your song. The quick recording will start automatically. The [REC] led remains ON in a red color. The [PLAY] led will flash green and red. When you have finished playing your song, press the [STOP] button of the recording section. Don't forget to save your "NewSong" !
You can now listen to your recording, which is a midi file saved as "NewSong.mid" or whatever name you decided to gave it. Click on the link here (NewSong.MID) to download the midi that I recorded for this article.
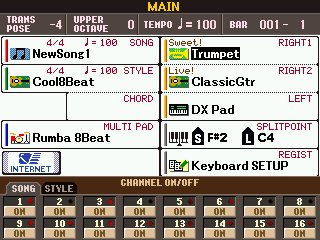 While
playing your newly recorded song, press the [CHANNEL ON/OFF] button. This will
turn on the "CHANNEL ON/OFF" display at the bottom of the MAIN screen showing
the 16 SONG (or STYLE) tracks. See screen shot.
While
playing your newly recorded song, press the [CHANNEL ON/OFF] button. This will
turn on the "CHANNEL ON/OFF" display at the bottom of the MAIN screen showing
the 16 SONG (or STYLE) tracks. See screen shot.
You will notice that some of the 16 channel led's will show activity, that is, the light will be flashing when something is playing on that channel. These channels are occupied. Remember, or write down, the free channels -- the channels that do not show a red led. In the case of the NewSong.MID that I recorded, I have channels 2, 4, 7 and 8 free for recording.
Press the [STOP] button of the recording section. Now you can choose a different instrument on RIGHT1, for example, an electric piano. In the next section, we add additional voices to our song.
Add Additional Voices
In my initial recording, I used a Sweet! SopranoSax as
the RIGHT1 voice. In this step, I want to add an electric piano to
the song so I set the RIGHT1 voice to be ElectricPiano.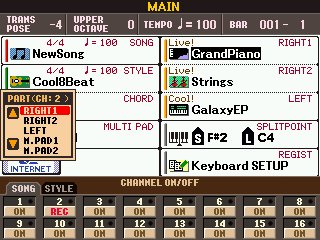
Press the [REC] button and the [CHANNEL 2] button (the top button [2] under the MAIN screen display) at the same time. A small popup menu appears where you can select the voice for the CH:2 PART (see screen shot). Make sure you choose RIGHT1.
Now, press the [PLAY/PAUSE] button once and the keyboard starts playing your NewSong midi file.
Play along using the RIGHT1 voice and, after recording is done, press [STOP] in the song recording section. If your playing was OK, save your song using a new name, for example, "NewSong1". Or, if you are satisfied with the result, you can save your song as "NewSong", which would overwrite the previous version.
If you are NOT satisfied, you don't have to save the new result. Load "NewSong" again and repeat the steps outlined in this section.
You can now hear your results by playing your NewSong1.mid file. Here are my results for NewSong1.MID.
In my sample song, I wanted to add a trumpet voice to the recording. I changed my RIGHT1 voice to Sweet! Trumpet. Press [REC] and [CHANNEL 4], choose RIGHT1 in the popup menu. Then, press the [PLAY/PAUSE] button of the recording section. The song starts playing and you add your next voice by playing the RIGHT1 instrument. When done recording, press [STOP] and, if the recording is OK, save your "NewSong3" or overwrite "NewSong" again. Here's my midi after adding the trumpet: NewSong2.MID.
You can repeat the above steps for any empty channel that's left.
Make Changes with the Mixing Console
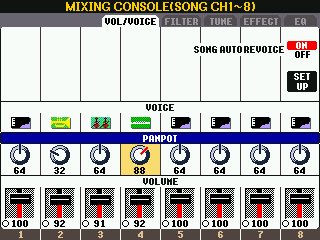 To make the recording sound better, press the [MIXING CONSOLE] button until
you see MIXING CONSOLE (SONG CH1~8) at the top of the screen display.
To make the recording sound better, press the [MIXING CONSOLE] button until
you see MIXING CONSOLE (SONG CH1~8) at the top of the screen display.
Now you can set the volume of the new channels you added (2 and 4 in my case) by pressing button [E] on the left side of the screen to select the VOLUME row. Buttons [2] and [4] below the screen can now change the volume levels for tracks 2 and 4.
By pressing button [D] you can set the PANPOT row where you can alter the direction of the sound coming from each track. For example, you may want the sound from channel 2 coming from the left and channel 4 sound coming from the right in the Stereo Spectrum.
You can even press button [C] and choose the VOICE row where you can examine the instrument playing in each track and even select an alternative voice for that track if you want.
If you want to apply a special effect to any voice, [TAB] over to the EFFECT screen and choose different effects for any of the voices in the song.
Don't forget to save your song again after making changes!
And that's all there is to making a multi track recording.
make an MP3 of your Midi recording
Use a (multi) recording program on your computer or hard disk recorder. You need to make an audio connection from your keyboard (Line-Out) to the Line in of the recording equipment in that case.
I use Samplitude Studio from Magix, which cost me about $100. With this program, I can record the "NewSong2.mid" from the keyboard and save it as an MP3 file. Of course, there are a lot of good programs that can do this job.
There is also a Free Audio recording program named Audacity. You can download it for free together with the Lame Encoder for exporting a WAV file to MP3.
On some newer PSR models and on the Tyros 2 and higher Tyros models, you can make a WAV or MP3 recording after your midi recording is finished. WAV files are very big (up to 45Mb) and so they should be converted to MP3. You may find some free tools on the Internet that can do this job.
I hope I have made some things clearer about multi track recording. If you have any additional questions, don't hesitate to contact me at ernie.nl@chello.nl
Regards,
Ernie
This page updated on February 15, 2024 .