Getting the YEM Application
From the PSR-SX900 page that was reviewed in the previous lesson on "Acquiring Expansion Packs," the top navigation menu included a link to Yamaha Expansion Manager (YEM).

Following that link gives you some information about the YEM:
"The Yamaha Expansion Manager is an application that you run with your computer, connected to your instrument. It allows you to manage every aspect of your Voice & Style Expansion content, and load it to your instrument."
It also explains some of what the YEM can do:
"With Yamaha Expansion Manager, you're no longer limited to using just one Expansion pack at a time. When connected with your PSR-SX you can install multiple Expansion Packs!
"You can also use your on-board memory more efficiently by creating a Personal Pack. Select your favorite Voices, Styles, Registrations and other Contents so you can use exactly what you need from your favorite packs.
"In addition, you can create your own original voices and drum kits form your recorded sample data."
But, there is no link to the program itself. For that, you need to click on the Downloads link in that SX900 navigation bar.

The available downloads for the SX900 are listed in several categories: Firmware/Software, Manuals, and Other Downloads. Look in the Firmware/Software table and you will see several entries for Yamaha Expansion Manager. The most recent update (April 8, 2021) is V2.8.0 for both Windows (67MB) and the Mac (43MB).
The software name is a link that that opens a page for that product. I clicked on the Windows version of YEM. This opened up a page titled "Yamaha Expansion Manager V2.8.0 for Windows 10/8.1" There were instructions on How to Install the program:
- Double-click Setup.exe, which can be found in the folder where you unzip the downloaded file.
- Follow the instructions displayed to install Yamaha Expansion Manager.
And instructions on How to launch the Application:
![]() After installing the Yamaha Expansion Manager, double-click* the Yamaha Expansion Manager icon to launch the application.
After installing the Yamaha Expansion Manager, double-click* the Yamaha Expansion Manager icon to launch the application.
[*Note]
- Before double-clicking the Yamaha Expansion Manager icon, please make sure you are connecting your PC to the Internet.
- If you are using Windows 8.1 and cannot find the Yamaha Expansion Manager icon in the Start window, right-click at any location where there are no icons and then click All apps when it is displayed at the bottom of the screen. All installed applications will now be shown, and from here, you can select and launch Yamaha Expansion Manager.
You then encounter a Version History table with notes on all the earlier versions, a list of System Requirements, and, finally, a License Agreement and Download File section. At the end of the License Agreements is a checkbox indicationg "Yes, I agree". You need to agree by checking the little box. When you do, the actual download button is now active. You can click on it to begin the download process.
When the download was done, I found the file "yem_v280_win.zip" sitting in my Downloads folder. Within the zip file is a folder called "Expansion Manager." Within that folder was a single file: setup.exe. Unzip the download file to get to the Expansion Manager folder, open it and run the setup.exe file to install YEM on your computer.
For a 4 minute video illustrating this process, check out the Yamaha Expansion Manager V2.8.0 - Installation and New Features by Casper tutorSynth.
Getting the YEM Owner's Manual
Since YEM is a application, you may want to get the YEM Owner's Manual. You can get it this way. Go to the main Yamaha site, select Keyboard Instruments, select Downloads, select Manuals (this link will take you right there). This shows a table of all the Yamaha manuals. The table continues over many pages. Use the Search function to narrow down the list. I entered "Expansion" in the Search bar and the resulting table contained only three items including The YEM Owner's Manual and the YEM Installation Guide.

All three of these are pdf files and the second column shows the size of each. The pdf icon and size under the "English" column are links to the pdf file. Click on that link to launch the pdf file, which will be displayed right from your browser. You can read the information in your browser.
If you would rather download the file, note the option bar at the top of the pdf display. It shows you what page you are viewing, offers a Search option, let's you shrink (-) or enlarge (+) the text. If you browser has a wide window, more options are shown. If not, a More Options icon (...), shows you the additional options. Click on that icon for a drop-down list of additional options, one of which is "Save". Select that "Save" option to download the pdf file to your computer.
For a broad overview of the Features and Function of Yamaha Expansion Manager, check out this 5 minute video by Yamaha_Global. It focuses on the PSR-S970, S770, and S670. It shows downloading YEM, getting instrument info, filling an empty YEM with targets and packs, editing packs and voices, and creating an installation pack.
Launching Yamaha Expansion Manager
 Once you have installed the YEM by running the setup.exe file, you will see an icon on your desktop as shown here. You can also click on the Start icon, scroll down through the list of applications until you find a Yamaha folder, open that and you see the Yamaha Expansion Manager program. Click on it to launch the program. You can also right-click on the program and choose to pin it to Start or pin it to the Task bar.
When you first launch YEM, you will see a screen like the one below. The My Packs area will be empty since there are no packs yet installed. Also, on the left where the Target keyboard(s) are listed, there are none listed because no targets have yet been installed. Under My Packs the [+] icon is used to import a project Expansion Pack (cpf or ppf) file. Under InstallTarget, the [+] is used to import anr InstrumentInfo file).
In the next section I will install a target keyboard and then import some of the expansion packs.

Here is a 6 minute video, Learn the Basics with YEM, by Styles2psr. For the PSR-S770, it covers where and how to download YEM, how to export instrument ID, adding instrument ID to YEM, and importing Yamaha Expansion packs (cpf files). Video is silent but has text explanations.
The discussion below focuses on the PSR-SX900. Here is an 11 minute video with English commentary, How to Use Expansion Manager, by Leigh Wilbraham covering many of the same steps for Genos owners. It shows getting instrument ID from Genos, creating Genos Target in YEM, importing a sound pack, creating and installation file, and installing that file in the Genos.
Getting Instrument Information
The YEM converts Expansion Packs to a format that will work on a particular Yamaha keyboard. In YEM that keyboard is known as the "Target". To create a Target keyboard, you need information about that keyboard. That information is contained in your Yamaha keyboard. You need to get it by exporting your Instrument Info to a USB drive.
PSR-S975 Instrument Info
If you have a PSR-S975 or earlier, the steps to export your instrument info are provided in the Owners Reference Manual:
1 Connect the USB flash memory to the [USB TO DEVICE] terminal.
2 Call up the operation display.
[FUNCtION] - TAB [>] MENU2 - [G] SYSTEM - TAB [<] OWNER

3 Press the [D] (EXPORT INSTRUMENT INFO) button.
4 Follow the on-display instructions.
PSR SX-900 Instrument Info
 The screen shots are taken from the PSR-SX900 but the process will be similar on the SX-700 and SX-600. These keyboards have a touch-screen display so the user interface is different from the earlier PSR-S models.
Press the [Menu] button on your keyboard. This opens up the Menu1 display. Select the Menu2 tab. As seen in the Menu2 screen shot shown here, one of the available options is "Expansion". Select the "Expansion" option to go to the Expansion Menu screen shown here.
 This is a very simple screen. There are only three options.
1. The first option is "Export Instrument Info" and that is the option we will be using below.
2. The second option is "Pack Installation." You go to this screen when you are ready to install a new pack created by YEM. The next lesson will cover installing a new pack.
3. The third option on the PSR-SX900 is "Restore Pre-installed Expansion Contents." The SX900 comes with four Pre-installed expansion packs as you saw in the Exploring lesson. This third option does just what it says. It replaces whatever is in the PSR-SX900 Expansion memory with the contents of the 4 pre-installed packs (African, Europe, Latin American, Oriental).
 I am going to use that first option to export the PSR-SX900 instrument info. You need to have a USB drive connected to your keyboard to receive that Instrument Info. So, after pressing the "Export Instrument Info" button, I was alerted to this fact. The export process is paused in case you need to insert a USB into your keyboard. You can Cancel the operation or select OK if you are ready to proceed.
 When the export is complete, and it happens very fast, you get a message informing you that the export is done. The file name is automatically generated. Press [OK] to complete the process.
The new file is created and written to the root directory of the USB drive. In my case, the new file was called "PSR-SX900_instrumentInfo.n27". The term "root directory" means that it is not in a folder, but is at the top of the directory listing.
Note that the filename includes the model name. The PSR-SX700 would have a different info file as, of course, would the PSR-SX600 model and the Genos and Tyros5 models. Each of these models have different amounts of Expansion Memory available. They also have varying numbers of preset voices available. YEM will use this info to help determine the restraints on building your own personal expansion installation file.
Installing a Target in YEM
Moving back to the YEM program on the computer, I click the [+] button next to Install Target and a drop-down menu offers two options: "Import Instrument Info" or "Search Instruments". I choose to import the file. A directory window opens where you can navigate to the USB drive and select the Instrument Info file, in this case the "PSR-SX900_instrumentInfo.n27" file. If you have copied that file to some folder on your computer, you can select it from there. With the info file selected, click on the "SAVE" button and YEM imports that file.
 When completed, the list of targets under "Install Target" now has one entry. If you have more than one keyboard that can use expansion packs, you can extend that list by importing the instrument info for your other keyboards.
 With a list of one or more Target keyboards, select the keyboard that you wish to create a new installation expansion pack for. When you do, the keyboard is highlighted and the name of that keyboard shows over the pack area.
In this case, I selected the only target listed, the PSR-SX900. The name of the keyboard now appears over the pack area, which is still blank since no packs have yet been installed.
Importing Expansion Packs into YEM
 Click on the "My Packs" button. This takes you back to the empty My Packs screen that you saw when you first launched YEM (see figure above). To the right of the "My Packs" title are two buttons: [+] and [>]. Clicking on the [+] button gives a drop-down menu with two options: "Create Pack" or "Import Pack".
To add one of the expansion packs you have downloaded, choose the "Import Pack" option. I did and from the directory window shown, I navigated to a folder where I had stored all my Expansion Pack "cpf" files and selected the "BestOfEurope_SX900.cpf" file. YEM imported that pack and now I had one expansion pack showing under "My Packs".
Importing a pack takes very little time. In just a few minutes I imported 17 different expansion packs into YEM. These all appear in the "My Packs" area:

If I still had my Tyros5 as well as the PSR-SX900, I could have imported packs for the Tyros5 and the PSR-SX900. They would all show up in the "My Packs" area.
Selecting Packs to Install
To narrow down the choice to just the PSR-SX900. I now select that as my Target. The packs space is now titled "PSR-SX900. All 17 packs are still there. Now they all have a check mark indicating that they are to be included in a new expansion pack that I am going to create for the SX900. My new installation pack would contain the contents of all of these 17 expansion packs. The screen shot below shows the top part of the YEM screen showing only the first 5 packs in the group of 17.

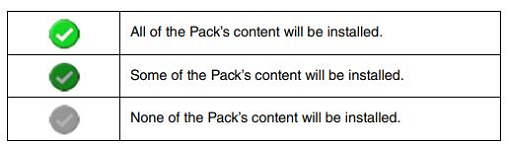 There is a green check mark now showing on all of the packs in the PSR-SX900 space. That check mark can take three forms as shown in the table here. When the entire pack is selected, that check mark automatically appears on all the individual files of the pack.
The check mark is a toggle (on/off). If you click on any of the selected packs, the greyed out version of the check mark appears. That indicates that the pack is NOT selected. None of the individual contents of the pack will be included. You can click on the pack again to select everything once more.
With a pack deselected, you might decide that there were one or more voices or styles in that pack that you wanted to include. Looking at the pack contents, click on each of the items you want to include in your installation file. The individual items you clicked now have a green check mark. Click on them again to exclude them. If you include some of the items in an Expansion Pack, the pack check mark will look like the second version above.
Installation Constraints
Notice at the top of the PSR-SX900 pack area is a drop-down box currently showing "Voice Wave Size." To the right of that you see "1044 / 1004 MB". This means these 17 selected packs are using 1,044 MB of the available 1,004 MB on the SX900. The 17 packs require more Voice Wave size than the SX900 has available. All 17 packs will not fit in the PSR-SX900.
The downward facing arrow shows three additional areas of constraint on the PSR-SX900.
- Voice Paramater Size (4026 / 20480 KB)
- User Drive Size (30546 / 4194304 KB)
- Pack Install File Size (1071 / 4096 MB)
The SX900 has 4GB available for expansion pack storage. The space available on the other PSR-S models is far more limited. If I click on the (include) check mark on an expansion pack to change it to (exclude), that eliminates the pack from the new pack to be created. Suppose I eliminate both Church & Christmas and Church Organ packs:

You can see the change in the illustration above. Now there are only 15 packs selected. Let's see what the new constraints look like:
- Voice wave size (957 / 1004) MB
- Voice Paramater Size (3474 / 20480 KB)
- User Drive Size (28913 / 4194304 KB)
- Pack Install File Size (980 / 4096 MB)
All four areas are now below the maximum sizes for the PSR-SX900. The 15 selected packs can be combined into a single installation file for the SX900.
If you have a PSR-SX700, your user drive size maximum is about 1 GB. You could only combine some of these for your keyboard. Consider the table below. I selected each pack individually and checked the four parameters. The individual packs are very consistent in their varius size measurements. But there are definite economies of scale.
| Voice Wave Size (MB) | Voice Parameter Size (KB) | User Drive Size (KB) | Pack Install file Size (MB) | |
| Max for SX930 | 4,096 | 20,480 | 4,194,304 | 4,096 |
| No Packs | 0 | 0 | 0 | 405 |
| Best Europe | 477 | 285 | 2582 | 469 |
| Brazil | 448 | 133 | 2362 | 440 |
| Celtic | 452 | 174 | 1984 | 443 |
| Church&Christmas | 475 | 264 | 1484 | 466 |
| Church Organ | 444 | 323 | 150 | 164 |
| Cumbia | 462 | 196 | 1900 | 454 |
| East Europe | 469 | 233 | 2083 | 461 |
| Iberia | 577 | 355 | 2420 | 570 |
| Italy | 514 | 252 | 2311 | 507 |
| Latin America | 443 | 143 | 998 | 443 |
| Mexican Banda | 449 | 184 | 1572 | 440 |
| Norteno | 450 | 181 | 1453 | 441 |
| Romania | 545 | 344 | 2107 | 537 |
| Salsa | 437 | 133 | 1832 | 429 |
| South Europe | 488 | 330 | 1800 | 480 |
| West Europe | 475 | 406 | 2149 | 468 |
| Average | 475 | 246 | 1824 | 451 |
| Combined packs | ||||
| Latin (6 packs) | 622 | 886 | 10115 | 622 |
| Europe (9 packs) | 751 | 2605 | 18798 | 765 |
| 15 packs | 957 | 3474 | 28913 | 980 |
The average wave voice size for packs was 475 MB. Six times that average would be 2,850 MB. But when I selected 6 packs of Latin-type styles. The combined Voice Wave size was only 622 MB. Choosing 9 European packs, the wave size increased to 751 MB. We saw above that 15 of the packs totaled 957 MB for wave size.
The bottom line is that any of these packs would fit on the a particular PSR-S model but you have to watch the Voice Wave Size and Installl File Size carefully as you combine packs together.
Selecting Pack Contents
Whenever you select one of the available packs, the contents of that pack are shown below the pack area. In the illustration below the Church&Christmas pack is highlighted but it is not selected for the pack to be created.
Below the available packs is a list of all the files in whatever pack you have highlighted. The pack name is shown at the top of the list. Since the pack is not selected for inclusion, none of the contents are checked. 
 The content type is identified by the icons shown. The table shown here, from the Yamaha Expansion Manager Owner's Manual, explains what each icon means. This pack has 48 normal voices, 2 drum voices, 30 styles (each of which is numbered), 3 songs, and 10 registrations. Since the pack is not selected, none of the content will be loaded. However, you can choose to include any of the various files in this collection by simply clicking on them. Clicking on a file puts a check mark on that item. You can drag your pointer over a range of items to check (or uncheck) them all.
 As an illustration, in the YEM screen segment shown below, I have chosen to include four voices. Their icons have a check mark on them. As soon as you select some icons, the installation button on the pack changes to show that some of the pack contents will be installed. If you can not fit an entire expansion pack, you can eliminate it and then individually add components while you remain below the Voice Wave Size maximum.

Four voices from the Church & Christmas Expansion Pack are checked for inclusion in the final installation file (two ChurchOrg, GospelOrg, and Organ Bells).
Create Install Pack
I am going to create a "Latin" install pack with 6 expansion packs included: Brazillian, CumbiaLatino, Latin America (one of the pre-installed), Mexican Banda, Norteno & Mariachi, and Salsa. With these 6 packs selected, I go to the top right corner of the PSR-SX900 line and click on a button labeled "Save as Pack Install File".
A directory window opens with a default File name for my pack (PSR-SX900_PackInstallData.cpi). You can edit that name if you like. I changed the file name to LATIN_PackInstallData.cpi.
Under "Save as type:" you have two choices:
- Pack Quick Installation File (*.cqi)
- Pack Installation File (*.cpi)
The "c" indicates the pack is copy protected. All the Yamaha Expansion Project Packs will have a file type of .cpf. All of the Installation files will have a file type of cpi or cqi. The cpi installation file, when installed on your keyboard, erases everything currently in your Expansion Memory and then installs the contents of this pack installation file.
The quick installation file (cqi) does not erase everything first. Rather, it updates what is there with the contents of the installation. More information will be provided on the quick installation in the next lesson on Installing Expansion Packs.
When you are ready with your file name and file type, click the [Save] button on the directory screen. There is also a [Cancel] button if you do not want to proceed. The installation file will be stored on your USB drive. Make sure you have enough room on that drive. My "Latin" pack was 222 MB. It will take several minutes for the pack to be created.
BB Walker TV provides a 33 minute video (in English) called How to use Yamaha Expansion Manager. It uses the PSR-S670 keyboard and explains user expansion pack installation and how to import a CPF into YEM and then create a CPI file for use in the S670. This keyboard has very limited Expansion space and the video illustrates the problem of trying to select components from Expansion packs and still stay under the maximum levels allowed.
With the installation file on your USB, it is now time to install it on your keyboard. I'll discuss the installation in the next lesson.
This page updated on February 15, 2024 .