The first section below discusses selecting voices on the SX900/SX700, which will be similar on the GENOS. If you have an earllier keyboard, jump down to the Earlier Models section.
the SX900 Keyboard
The keys on your keyboard look just like piano keys and, with the right settings, you can play your arranger keyboard just like a piano. But you can also sound like an entire orchestra on that keyboard. How does this happen? By dividing that keyboard into different parts.
The SX900 has 61 keys covering 5 octaves. An octave consists of the 12 notes C, C#, ... A#,B. The octaves are numbered from 1 to 5 and the far-left octave includes the lowest notes from C1 to B1. The far-right octave has the highest notes from C5 to B5. The last key is C6. This numbering scheme is simply a convenient way to refer to individual keys. For example, "Middle C", similar to the middle key on a piano, is C3.
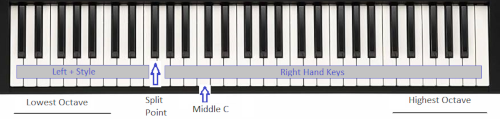
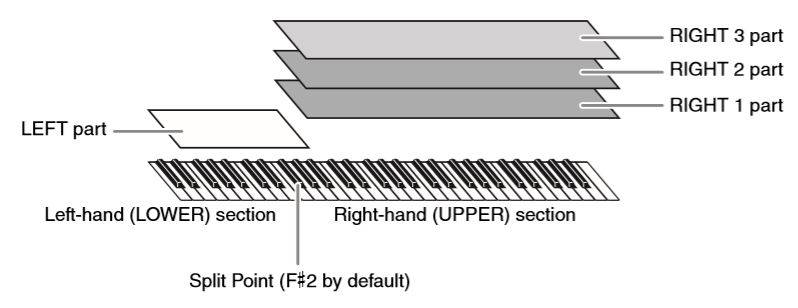 Consider the illustration shown here, which is taken from the PSR-SX900/SX700 Owners Manual. On arranger keyboards the 61 keys are divided into two parts, one for the left hand (Left Part) and one for the right hand (Right Part). The dividing line is called the "Split Point" and by default is F#2, although you can reset that split point to be any key you want.
Four voice "Parts" (Left, Right1, Right2, Right3) are available to the player. The "Left" voice is played on the keys to the left of the split point. The three "Right" voices are played on the keys to the right of the split point. You, as the performer, can turn any of the voice parts ON or OFF. You can also specify which instrument voice is assigned to each of the four parts. We'll discuss how you do that in the next section.
Note that if you turn on the style accompaniment feature (by pressing the [ACMP] button on your keyboard), the left side is also used to indicate the appropriate chord for the style accompaniment. Styles will be discussed in the next lesson. In exploring the voices, turn off the [ACMP] button.
PART Buttons
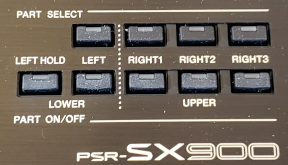 While the touch-screen interface can be used to select voices and to turn them on or off, there are also buttons to accomplish this just like on earlier Yamaha keyboards. However, unlike earlier PSR models, the PSR-SX models include a third Right Hand voice (R3). Use the PART ON/OFF buttons to turn the voice ON or to turn it OFF. When a voice is ON, the light in the button will also be ON. The PART SELECT buttons are used to select a voice for that part.
Turning Parts on/Off Using the HOME Screen
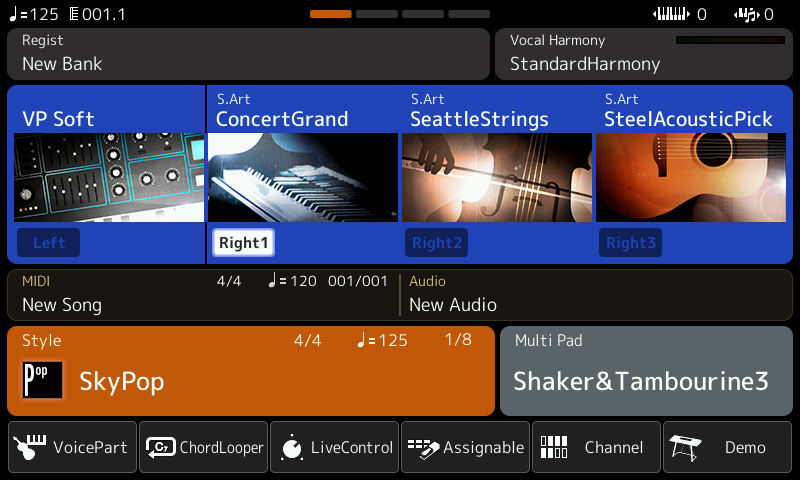
Below is the HOME screen of the SX900. The currently loaded voices are shown prominently on this screen. There is a picture for each instrument. Above the picture is the name of the instrumental voice and below the picture is the voice part: Left, Right1, Right2, and Right3. It a voice is ON, it shows the voice part highlighted. The Right1 voice, ConcertGrand, is ON and all the other voices are OFF. Touching a voice part name turns the voice ON or, if it is already ON, it turns the voice OFF. With the setup shown, if you played the right-hand keys, you would hear only the ConcertGrand voice. If you turned on the SeattleStrings by clicking on Right2, you would hear the ConcertGrand as well as the SeattleStrings.(Click on any of the screen shots to open a larger picture.)
Selecting Different Voices
![]() To change a voice, touch the picture or the voice name to move to the Voice selection screen. For example, touching "S.Art ConcertGrand" or the picture of the ConcertGrand opens up the Right1 Voice screen (shown below).
To change a voice, touch the picture or the voice name to move to the Voice selection screen. For example, touching "S.Art ConcertGrand" or the picture of the ConcertGrand opens up the Right1 Voice screen (shown below).
![]() Notice at the top of the screen a box with three entries [Preset | User | * ]. The first choice, Preset, is highlighted and this means that you are looking at the Preset voices that come with the keyboard. The second choice "User" is for voices that you may have created yourself or obtained from third parties. The third choice, indicated by the "*" is where you can store your "Favorite" voices. Make sure that [Preset] is selected.
Notice at the top of the screen a box with three entries [Preset | User | * ]. The first choice, Preset, is highlighted and this means that you are looking at the Preset voices that come with the keyboard. The second choice "User" is for voices that you may have created yourself or obtained from third parties. The third choice, indicated by the "*" is where you can store your "Favorite" voices. Make sure that [Preset] is selected.
Below the top line the screen is divided into two parts. On the left are 11 Voice categories. The current category is the high-lighted Pianos & E.Pianos. On the right are 10 voices from this Category. There may be multiple pages of Piano & E.Piano voices. The S.Art ConcertGrand voice is highlighted indicating that this is the selected voice. To select a different piano voice, simply touch the voice you want.
At the bottom of the voice screen, P1 is highlighted indicating that this is the first page of Piano voices.
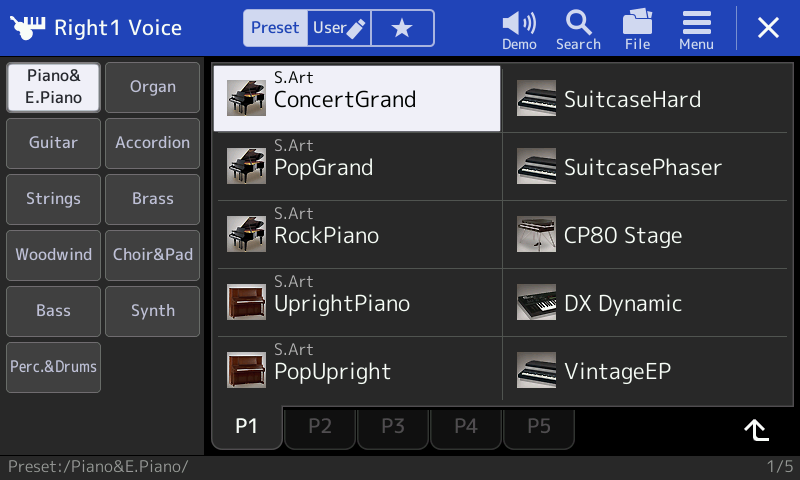
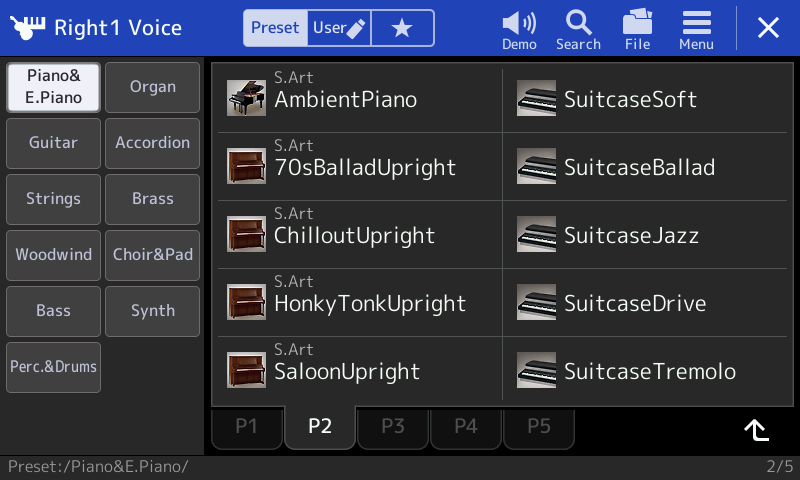
There are four more pages of Piano and E.Piano voices. You can see this (barely) from the additional page tabs (P2, P3, P4, and P5). To see the second page of piano voices, touch the P2 tab.
From this Right1 Voice screen you can view the voices in any of the categories. Touch the "Organ" tab and the first 10 organ voices are shown.
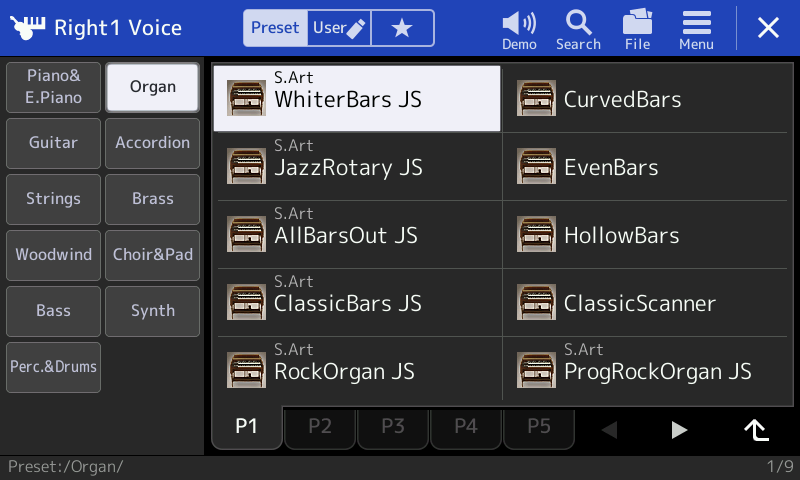
In this screen note that WhiterBars JS is highlighted. If you were to close this Right1 Voice screen now by pressing the "X" in the upper right-hand corner, you would be returned to the HOME page and WhiterBars JS would be shown as your Right1 voice.
Voice Categories
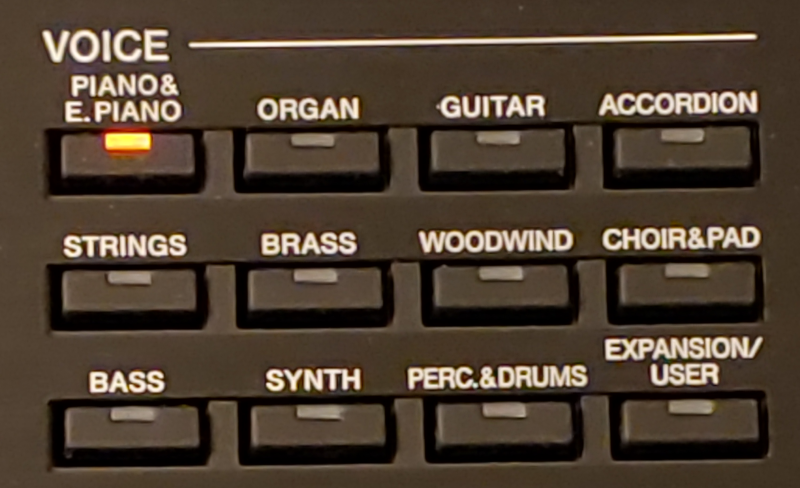 The illustrations above show how you can use the touch-screen interface to explore voices in any of the available categories. This is another case where there are also Voice category buttons on the keyboard that can be used to take you to the appropriate voice screen. These voice buttons are on the right side of your keyboard. The PIANO&E.PIANO category is highlighted indicating the last category looked at.
The PART SELECT buttons, which are located right below the VOICE buttons, are used to select any of the four voices. When you press one of the PART SELECT buttons, the VOICE button for the category of the voice in that part is highlighted and the screen shows the voice currently in that part. To choose a different voice category, push the category button or touch the category label on the screen. To select a new voice, however, you need to use the touch-screen to select the the voice.
Demo the Voice
![]() At the top of every Voice selection screen, is a "Demo" button shown as a speaker icon. With any voice selected, press the "Demo" button to hear a short demo of that instrumental voice. The other options at the top of this screen are discussed elsewhere. You can also, of course, demo the voice selected by playing the keys on the keyboard.
At the top of every Voice selection screen, is a "Demo" button shown as a speaker icon. With any voice selected, press the "Demo" button to hear a short demo of that instrumental voice. The other options at the top of this screen are discussed elsewhere. You can also, of course, demo the voice selected by playing the keys on the keyboard.
When you are done exploring the many beautiful voices available, you may be ready to try out some of the fantastic styles that come with your keyboard. Those are covered in the next lesson.
Selecting Voices on PSR & Tyros
arranger Keyboard Keys
You'll be making music by playing the piano-like keys on your keyboard. I use the expression "piano-like" because while these keys look like piano keys, they will not feel like piano keys. They will feel much more like accordion or organ keys. The keys can be "touch sensitive", an option you can turn on or off, which means the harder you strike a key, the louder will be the sound produced. But this is a control that you can set and you will be able to play relatively loud music with a light touch. Piano players may be used to "pounding" the piano keys, but you won't have to do that on these keyboards.
You have 66 keys, which counts both the black and white keys. There are 12 keys in an octave, from C to B, and your keyboard has 5 octaves with the lowest (low notes) being on the left and the highest (high notes) being on the right. The keys, of course, correspond to music notes and have names -- C, D, E, F#, Ab, etc. They also are identified by numbers. The lowest octave keys are identified as C1, C#1, ..., B1. The next octave is labeled C2, C#2, D2, ..., B2 and so on up to the highest key, C6. C3 corresponds to "middle C" on the piano, that is, the C located in the middle of a piano keyboard. See the figure below.
Splitting Your Keyboard
An arranger keyboard is distinguished primarily by the fact that it includes preset "styles" that automatically accompany the performer while playing a song. These styles are triggered by the performer playing a chord, which the instruments in the style follow. That chord can be triggered by pressing a single key for the chord, i.e. "C" would mean the C-major chord. Alternatively, the player can trigger the chord accompaniment by playing the actual notes of the chord (for example, C - E - G for the C-major chord). But how can you indicate chords by playing keys and also play the notes in the melody of a song? The player accomplishes this by playing the "chord" with the left hand and the melody with the right hand. The keyboard, of course, doesn't know which "hand" you are using so you have to logically "split" the keyboard into two parts - one for your left hand, and the chords, and one for your right hand, and the melody.
Initially, that "split point" is set at F2#. All the keys from C1 up to F2# are used to finger the "chords" needed by the accompaniment. The keys from G2 up to C6 are used to play the melody. If you are using the accompaniment feature of this keyboard, this is how you would play the keys. However, you do not have to play with the accompaniment feature ON. Look on the left side of the top panel of your keyboard and notice the button marked "ACMP". That button turns the accompaniment feature ON and OFF. For now, to focus on the voices in your keyboard, make sure that button is OFF as you try out some of the keyboard instrument voices. In the next chapter, we examine styles and will turn the ACMP feature ON and explore your options there.
Voice Parts
On the right side of your keyboard, you will see a series of buttons for selecting voices and for turning voices on and off. The figure below shows these buttons for the Tyros3, the PSR-S910, and the PSR-3000. As you can see, they look a little different, but they all contain the same basic parts. The biggest difference is that the Tyros models have three right hand voices while the mid-level arranger keyboards only have two right-hand voices.
PART ON/OFF
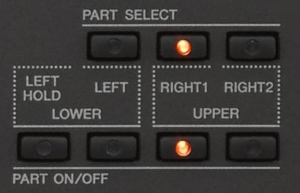 The image here is the PART SELECT section from the PSR-S970, which is the same on the S975. The "PARTS" referred to here are the LEFT, RIGHT1 (R1), and RIGHT2 (R2) voices. In this photo the RIGHT1 voice is selected (top button is ON). You can select any of the three buttons under PART SELECT. When you do, the VOICE screen opens to show you the current voice for that part and allows you to change that voice if desired.
The buttons on the bottom, labeled "PART ON/OFF", are used to turn individual voices ON or OFF. If the voice is ON, the button will be lighted (or the light in or above the button will be lit.) In this illustration the RIGHT1 voice is ON and the RIGHT2 and LEFT voices are OFF. If you play the keys on your keyboard and you don't hear any sounds, the first thing to do is make sure you have at least one voice turned on! Press the RIGHT2 button to turn it ON and both R1 and R2 voices will sound when you play the keys.
When the keyboard starts, the first Right-hand voice (R1) is normally set to ConcertGrand (or whatever the primary piano voice is on your keyboard) and that voice is ON. If the LEFT voice is OFF and the ACMP is OFF, then your entire keyboard will play that ConcertGrand voice. With the ACMP OFF and the LEFT voice OFF, that "split point" is no longer relevant and the entire keyboard plays the voice selected, in this case, a piano voice.
 The
second right-hand voice (R2 or LAYER on some models) is OFF, but you can
turn it ON and have both the R1 and R2 voices active. The screen shot here is from the Tyros3 where the
initial R2 voice is set to Live! Strings. So, with both R1 and R2 voices set to ON, when you play some keys, you
hear both a ConcertGrand piano and Strings playing together. If you were
to turn the R1 voice OFF, you would hear only the Live! Strings. Tyros owners
can even add a third voice and three separate voices can be combined and
all play together as the melody is played.
The
second right-hand voice (R2 or LAYER on some models) is OFF, but you can
turn it ON and have both the R1 and R2 voices active. The screen shot here is from the Tyros3 where the
initial R2 voice is set to Live! Strings. So, with both R1 and R2 voices set to ON, when you play some keys, you
hear both a ConcertGrand piano and Strings playing together. If you were
to turn the R1 voice OFF, you would hear only the Live! Strings. Tyros owners
can even add a third voice and three separate voices can be combined and
all play together as the melody is played.
PART SELECT
 Right
above the PART ON/OFF buttons are the PART SELECT buttons. The R1 voice is
the ConcertGrand piano. If you would like to select an alternative voice,
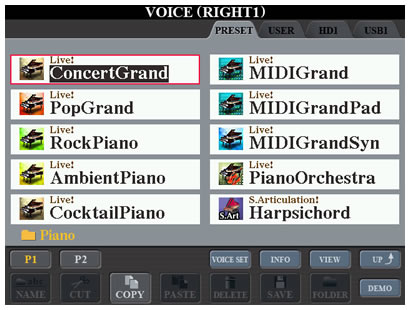
press the RIGHT1 PART SELECT button, the button that is lit in the S970 illustration above. That will bring up the VOICE (RIGHT1) screen showing the currently selected R1 voice (see the Tyros3 screen shown here).
Right
above the PART ON/OFF buttons are the PART SELECT buttons. The R1 voice is
the ConcertGrand piano. If you would like to select an alternative voice,
press the RIGHT1 PART SELECT button, the button that is lit in the S970 illustration above. That will bring up the VOICE (RIGHT1) screen showing the currently selected R1 voice (see the Tyros3 screen shown here).
You can also get to this VOICE (RIGHT1) screen from the MAIN screen by pressing the [F] button located to the right of the RIGHT1 cell showing the current ConcertGrand voice.
The preset ConcertGrand voice is currently selected as indicated by the highlighting of that voice. There are 9 other "Piano" voices shown. Notice the "Piano" folder name right below the last voice (CocktailPiano) on the left. All of these voices are in the "Piano" folder. But there are more than 10 piano voices in the Tyros3. Look at the two bottom rows. The top one starts with [P1][P2] and the bottom row shows two available options [COPY] and [DEMO]. Each "page" in the voice selection screens can show up to 10 voices. The Tyros3 has a total of 18 piano voices. The first 10 are shown on [P1] but another page is required to show the remainder. Hence, the [P2] page. To look at those voices, press the upper [2] button below the screen. To go back to P1, press the upper [1] button.
To select an alternative piano voice, press one of the [A] to [J] buttons. If you double-click your selection (press the button twice quickly), that will select the voice and return you to the MAIN screen. Alternatively, you can select a piano voice and then press the EXIT button to return to the MAIN screen.
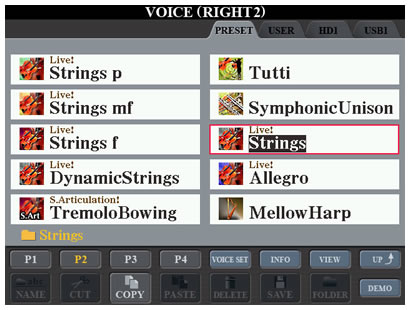 Try
the PART SELECT button for R2. This brings up the VOICE (R2) display screen.
Looks much like the R1 screen, doesn't it? In this case, voices are located
in the "Strings"
folder and the Live! Strings voice, found on page2 (P2) of the Strings folder, is selected. There are 40 string voices in the Tyros3
and it requires four pages to display them all. Hence, you see [P1][P2][P3][P4]
below the voice entries. Press the corresponding [1], [2], [3], and [4] buttons under
the screen to go to that page of 10 voices.
Try
the PART SELECT button for R2. This brings up the VOICE (R2) display screen.
Looks much like the R1 screen, doesn't it? In this case, voices are located
in the "Strings"
folder and the Live! Strings voice, found on page2 (P2) of the Strings folder, is selected. There are 40 string voices in the Tyros3
and it requires four pages to display them all. Hence, you see [P1][P2][P3][P4]
below the voice entries. Press the corresponding [1], [2], [3], and [4] buttons under
the screen to go to that page of 10 voices.
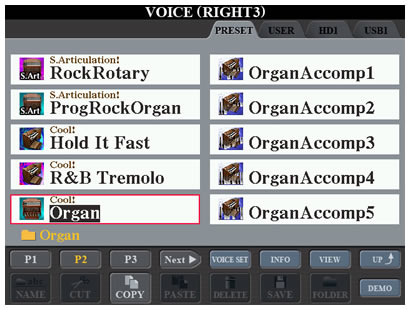 Let's
try one more screen since the Tyros3 has a third right-hand voice, initially set to Cool! Organ. In this
case, we are looking at the "Organ" folder. There are 48 organ
voices in the T3 and this requires 5 pages to display them all. Because of
the four extra buttons found on the Tyros models (VOICE SET, INFO, VIEW, and UP),
there is room for only 4 page buttons. So, you see 3 page buttons, [P1], [P2], [P3] followed by a [Next]
button. Press the upper [4] button to activate that next button and now you'll see the remaining
pages [P4] and [P5]. You'll also see a [PREV] button so you can return to
the first three pages. How many pages you can see depends on your keyboard
model. For example, the PSR-3000 has room to show [P1] through [P5] before
you encounter the [NEXT] button.
Let's
try one more screen since the Tyros3 has a third right-hand voice, initially set to Cool! Organ. In this
case, we are looking at the "Organ" folder. There are 48 organ
voices in the T3 and this requires 5 pages to display them all. Because of
the four extra buttons found on the Tyros models (VOICE SET, INFO, VIEW, and UP),
there is room for only 4 page buttons. So, you see 3 page buttons, [P1], [P2], [P3] followed by a [Next]
button. Press the upper [4] button to activate that next button and now you'll see the remaining
pages [P4] and [P5]. You'll also see a [PREV] button so you can return to
the first three pages. How many pages you can see depends on your keyboard
model. For example, the PSR-3000 has room to show [P1] through [P5] before
you encounter the [NEXT] button.
Voice Categories
Tyros3/4/5 - All of the Yamaha keyboards have a VOICE section on the right-hand side of the display screen. The voice categories available on the Tyros3 and Tyros4 are identical. Those on the Tyros5 are somewhat different. The Voice categories on the T3/T4 and the T5 are shown in the illustrations below. Note that the Tyros models can include additional sampled voices (EXPANSION category). This feature is not available on the mid-level keyboards. The Tyros3/4 GUITAR category is split into A.GUITAR and E.GUITAR on the Tyros5. Similarly the PERC/DRUM KIT category is divided into a separate PERCUSSION and DRUM KIT category on the Tyros5. The Tyros3/4 had buttons for BRASS and TRUMPET. On the Tyros5 trumpets are included in the single BRASS category. Similarly the SAXOPHONE and FLUTE/CLARINET buttons on the Tyros4 are combined into a separate WOODWIND button on the Tyros5. Finally, the USER DRIVE button on the Tyros3/4 is replaced with a button for the new ENSEMBLE feature available on the Tyros5.
Tyros 3/4 VOICE category buttons:

Tyros5 VOICE category buttons:

 PSR-S975/S970/S950 - The 15 VOICE category buttons on the PSR-S models are similar to the 18 buttons on the Tyros models. The S970 (shown here) has a GUITAR category while the Tyros5 has A.GUITAR and E.GUITAR. Similarly, CHOIR&PAD are combined on the S970 but are separate categories on the Tyros5. The ENSEMBLE voice category is only available on the Tyros5. The S975/S970/S950 models allow the user to expand the number of voices by adding an expansion pack, an option that is not available on earlier models.
VOICE Folders
If you press the ORGAN button, you get the same set of choices you saw in the "Organ" folder shown in the R3 screen above. Each of these voice category buttons represents a voice "folder" where the voices are stored. When you are looking at any of these main voice folders, pressing the upper [8] button to move "UP" takes you to a voice display screen showing you all the available voice folders. So, if you wanted to change the R1 voice from a ConcertGrand to a TenorSax (which is in the Woodwind category), you could, from the MAIN screen, select the RIGHT1 voice (pressing [F] button) and then press the WOODWIND voice button to go immediately to the WOODWIND folder where you will find a number of saxophone voices available.
Alternatively, you could use PART SELECT to select the R1 voice. If you still had ConcertGrand showing in the Piano folder, you would use the "UP" button to go up one level to see all the voice category folders. From there, select the WOODWIND category and search for the TenorSax voice or whatever sax voice you want.
GM & XG Voices
If you use the UP button to go to the main voice category folders, you may notice that there are some voice category folders that do not have a matching voice category button. In particular, you will see folders for "GM&XG" voices and for "GM2" voices. Don't overlook these folders. If you open up the GM&XG folder, you may be surprised to see 16 additional voice folders, each of which has many voices. The GM2 folder, if your keyboard has it, will open up to 17 additional voice folders. These two folders add many hundreds of voices that you can select. You'll even find a SoundEffects folder included in both GM&XG and GM2 folders -- a lot of interesting sounds to try out there!
Voice Demos
Finally, notice that all of these voice selection screens have a [DEMO] button located under the [UP] button. You would trigger this by pressing the lower [8] button. These "demos" provide a short demo of the voice selected. Of course, you could select the voice and then play some keys to hear what the voice sounds like, but the voice demos show off the voice characteristics and give you a better idea of what the voice can sound like as well as an example of where you might want to use it.
OK, you now know how to select voices. We did not show you the left hand voice selection, but it works just like all the others although it does have some additional features you will want to know about and we'll discuss that in the next lesson on selecting styles. In the meantime, feel free to explore your voices and enjoy the great sounds that your keyboard can produce.
This page updated on February 15, 2024 .