Registration settings are saved in Banks of 8 to either the internal USER memory, or the FLOPPY DISK drive. For further organization, folders can be created and named, then multiple Registration Bank "Files" can be organized within each folder.
Saving Registrations
Step 1. To save a single front panel setting (a "Registration" of how your keyboard
is configured) to one of the 8 REGISTRATION MEMORY buttons, press and hold
the [MEMORY] button, then press the desired Registration Memory button
[1] - [8].

WARNING: These settings are saved into a temporary memory buffer and will be lost when the unit is turned OFF, unless the Registration Bank file is saved by the following steps.
Step 2. Release the buttons.
Step 3. Repeat steps 1 - 2 for more Registrations (up to 8 total).
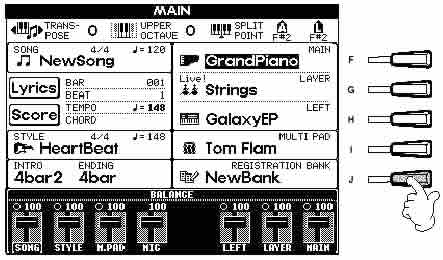
Step 4. Press the [EXIT] button twice, to return to the MAIN screen.
Step 5. Press the [J] button to open up the REGISTRATION BANK screen.
Step 6. Use the <TAB> buttons to select a permanent memory location (USER memory or FLOPPY DISK drive) where you will store this registration file. (On keyboards after the PSR-2100, CARD, USB, or HD1 may also be available as storage locations.)
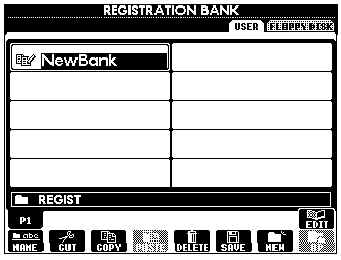
Step 7. Registration Banks can be grouped into folders if you want. If you do not intend to create a folder, skip to step 8. To create a folder, press the lower [7] button to select the NEW option under the folder icon in the Registration Bank Screen.
- Use the [1] - [8] toggle buttons under the screen to name the folder.
- Press the upper [8] button to select OK to store the folder into your chosen memory location.
- If you are going to store the registration in this folder, press the appropriate [A] - [J] button to open your new folder.
Step 8. Press the lower [6] button to select the SAVE option.
Step 9. Use the [1] - [8] toggle buttons under the screen to name the Registration Bank File. You should provide an appropriate name for the registration file.
2000 vs 2100 - This is one area where there is a difference between the 2000 and later keyboards. The 2000 always starts with an empty NewBank. However, the 2100, when you turn it on, has a registration bank set at whatever it was set at when you turned the keyboard off, although the "name" still says NewBank -- it does not save the registration bank name, but it does keep the contents.
Step 10. Press the upper [8] button to select OK to save the Registration Bank File into the chosen memory location. This creates a new Registration Bank File, with the name you just gave it, containing the current 8 registrations that are stored in the 8 registration memory buttons. (You do not have to have something stored in all 8 buttons. You can save a registration file with only one of the buttons containing data.).
Step 11. To name the 8 individual registrations contained in the Registration Bank File you just saved, do the following:
- Press the upper [8] button to select EDIT.
- Press the lower [1] button to select NAME.
- Use the [A] - [D] and [F] - [I] buttons to select the desired registration button title.
- Press the lower [7] button for OK.
- Use the [1] - [8] toggle buttons under the screen to name the Registration button title.
- Press the upper [8] button, OK, to store the name. You can repeat steps (c)-(f) to name all 8 registration buttons.
- Press the upper [8] button UP to return to the main REGISTRATION BANK screen.
- Press the [EXIT] button to return to the MAIN screen.
Loading Registrations
NOTE: The REGISTRATION MEMORY button settings are cleared whenever the unit is turned OFF on the PSR-2000/1000. To load Registrations back in after the unit has been turned ON, the following procedure must be performed.
- From the MAIN screen, press the [J] button to load the REGISTRATION BANK screen.
- Use the <TAB> buttons to select USER or FLOPPY DISK (or CARD or USB1 or HD1) memory area. You can load a registration memory file that you stored in USER memory or one that you stored on a floppy disk.
- Select the desired Registration Bank File:
- If folders were first created, use the [A] - [J] buttons to select the desired folder, then the desired Registration Bank File.
- If folders were not created, use the [A] - [J] buttons to directly select the desired Registration Bank File.
- Press the [Exit] button to return to the MAIN screen. Your selected registration file is now loaded and the name should show in the REGIST cell next to the [J] button.
- The 8 Registration Memory buttons will now call up the Registrations that are saved in the selected Registration Bank file.
NOTE 1: if you want to load a different registration bank
file you saved, just repeat steps 3 and 4.
NOTE 2: if you modified your current registration bank file in any way and
you attempt to load another registration bank file, the PSR will warn you
that the current registration bank has been changed and give you an opportunity
to SAVE it before replacing it with a different one. If you want to
save your modifications, select the YES answer and save your modified file. If
you don't want to keep the modifications, just select the NO answer and continue
on to pick your new registration file.
This page updated on February 15, 2024 .