There are many times when using your PSR or Tyros when you are asked to name (or rename) a file. The procedure for doing so is the same everywhere, so it is explained in detail here. When a new name is called for, you are presented with the Name Input box, which is displayed at the bottom of the file display screen.
 The
illustration shown here includes three of the name input boxes on the Tyros3:
one for when you are creating a NEW FOLDER, one for when you are saving a
file, and one when you are renaming a file. NAME input boxes on the Tyros4 and Tyros5 are similar.
The
illustration shown here includes three of the name input boxes on the Tyros3:
one for when you are creating a NEW FOLDER, one for when you are saving a
file, and one when you are renaming a file. NAME input boxes on the Tyros4 and Tyros5 are similar.
There is also an illustration of the name input box on the PSR-2000, which was the same on the 2100 and 3000 and one for the most recent mid-range model, the PSR-S950.
You can clearly see that, while the Tyros model is easier to read and more colorful, functionally the name input box has all the same options that are present in the versions on the mid-range models. Also note that whether we are naming a new folder or saving a file or renaming a file, the title of the name input box changes, but all the options are the same.
The characters that you use for entering a name and the options available are shown in two rows of 8 columns. You select the character or option you want by using the numbered buttons under the main screen. Let's call the buttons Below the numbers, [1B] through [8B] and the buttons Above the numbers [1A], ..., [8A]. To select the options you see on the bottom row, ICON, DELETE and CANCEL, you use the [1B], [7B], and [8B] buttons respectively. Use buttons [1A] and [8A] to select the options shown on the top row, CASE and OK. The numbered buttons [2] through [7] are used to select characters in the file name or, with button [7B], to delete a character in the file name.
Moving the Cursor
The cursor, shown as an "underscore" character, appears after the last letter in the name. It shows where the next letter you input will be placed. Look very carefully, that cursor can be hard to see.
You can move the cursor by using the Data Entry Dial. Turn the dial counter clockwise and the cursor moves left; turn it clockwise and the cursor moves right. Press the DELETE button [7B] to delete the character just to the left of the cursor. Continuously pressing [7B] will keep deleting characters if you want to clear the screen and start fresh.
Entering Characters
By now you may be familiar with pressing the numbered buttons below the screen to select an option. In the case of the NAME Input Box, however, the use of the numbered buttons is a little bit different. The option for button [3A] is shown as ABC2. If you press [3A], you will get the letter "A". How about "B"? Well, press [3A] a second time and the "A" changes to a "B". Press it again and you now have "C". One more press and you have "2". So, you actually have 4 characters that you can input by using button [3A]. Just keep pressing [3A] until you get the letter or number you want.
For example, to enter the title "WAVE" for a song, you would press [4B] to enter a "W". Next, you would press [3A] to enter the "A". Because you are choosing a different letter group, the cursor automatically puts the "A" in after the "W". Now you need to enter a "V". The V is located in the group labeled [TUV8]. That group is accessed with the [3B] button. When you press [3B] once, you get the "T". Press [3B] again and you get the "U". Press [3B] once more and, finally, you have your "V". So, as mentioned above, for letters that aren't the first letter in the group, you simply keep pressing the appropriate button and the display will cycle through the characters that are shown for that group. Now, press [4A] twice to get to the final "E". When you have completed your name, press [8A] to select OK.
Well, that wasn't too difficult. But how about a name like "BACK HOME"? The first three characters all come from the ABC2 group. Once you enter the "B", how do you enter the "A"? Here is where you have to use that data entry dial. Press [3A] twice to enter the "B". Now, carefully move the data wheel just a little bit to advance the cursor over to the next position. You can now press [3A] again to enter the "A". Use the data dial once more to advance to the next position and press [3A] three times to get to the "C". Finally, press [6A] twice to enter the final "K".
On recent keyboards, the name input feature changed so that if you entered the first "B" and then simply waited for a second or two, the cursor would automatically move to the next blank space where you could enter the next character, the "A". Again, wait for a second or two and then enter the "C". With this "pause" feature, you don't actually have to move the data entry wheel to advance to the next character.
Upper and Lowercase Characters
What if you wanted to enter upper and lower case characters, for example, "Back" instead of "BACK"? Press the [1A] button and the CASE option switches to case and all the alphabet characters are now shown in lowercase. Press [1A] again to go back to uppercase. Note: switching case will also automatically advance the cursor. So, if you were in uppercase, you could press [3A] twice to enter the first "B", then press [1A] to switch to lowercase. which will advance the cursor. Now press [3A] again and you enter the "a" -- you did not have to use the data dial. Of course, to enter the next character, a lowercase "c", you will have to use the data entry dial (or wait a second or two).
In the screen shots above, the NEW FOLDER input box shows the uppercase alphabet and the SAVE and NAME input boxes show the lowercase alphabet.
Special Characters
 On
the PSR-3000 and earlier keyboards, special characters are entered via the
[2A], [5B] and [6B] buttons. [2A] .,-1 displays
a period (.), comma (,), minus (-), and the number 1. [5B] displays a space(
), an underscore(_) and a zero(0). All of the available special characters
are shown with the [6B] key, which is shown in the illustration above. Here
you would use the data entry wheel to move the cursor to the character you
want to select it.
On
the PSR-3000 and earlier keyboards, special characters are entered via the
[2A], [5B] and [6B] buttons. [2A] .,-1 displays
a period (.), comma (,), minus (-), and the number 1. [5B] displays a space(
), an underscore(_) and a zero(0). All of the available special characters
are shown with the [6B] key, which is shown in the illustration above. Here
you would use the data entry wheel to move the cursor to the character you
want to select it.
 On
the Tyros2 and later keyboards, that [6B] key is now labeled as SYMBOL.
On the Tyros3, there are 58 symbols that can be selected although you will
be limited as to what are valid characters to start a name. Pressing [6B]
shows the available symbols. They all do not all fit on the input screen
at the same time. Initially, the first 33 characters are displayed. I used
the data entry wheel to scroll the list to the end to show the remaining
25 symbols. All of the available characters are shown enlarged in the illustration
above.
On
the Tyros2 and later keyboards, that [6B] key is now labeled as SYMBOL.
On the Tyros3, there are 58 symbols that can be selected although you will
be limited as to what are valid characters to start a name. Pressing [6B]
shows the available symbols. They all do not all fit on the input screen
at the same time. Initially, the first 33 characters are displayed. I used
the data entry wheel to scroll the list to the end to show the remaining
25 symbols. All of the available characters are shown enlarged in the illustration
above.
Although you can select a number of strange characters, I would suggest sticking to the basic alphanumeric characters with perhaps an apostrophe or parentheses used where needed. Remember, the screen can only show a limited number of characters in the file name.
If you make a mistake entering any characters, you can always use the DELETE option to delete entries. If you only messed up one character in a string of characters, simply use the data dial to move the cursor to that character and then enter the correct character.
Selecting Icons
You may have noticed that many of the "files" in the PSR and Tyros have a little icon next to the file name. For example, if you select a GrandPiano voice, you see a miniature piano as an icon. A trumpet will have a small trumpet as an icon. You can select any icon you want to go along with your file name. Folders already have a preset icon of a folder, which you can not change. Note in the Tyros3 screen shots above, the NEW FOLDER input screen did not have an ICON option, but the SAVE and NAME screens did.
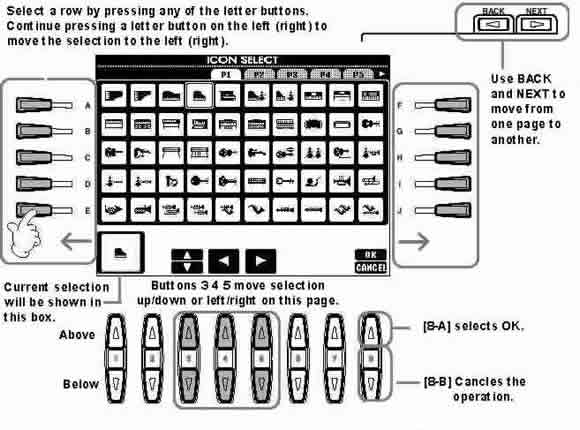
To choose an icon, select the ICON option [1B]. When you do, you will be presented with an icon selection screen. On the PSR-2000 (illustrated below) there are 5 pages of icons, each page showing 50 selections. You can use [BACK] and [NEXT] to go between the various pages. On any individual page, use the [3] buttons to move up and down the list of icons and the [4] and [5] buttons to move left and right. The cursor is, again, hard to see but if you look closely, you will see it. The icon currently under the cursor is also shown in the bottom left-hand corner of the screen. Examine the figure below to see how to navigate this screen and pick your icon. The selections should be similar on the PSR-2100 and the PSR-3000.
An Icon Example
 For
the sample task we will show in these lessons, I will be creating "my
own" version of a preset style and saving it in my own "Ballad" folder.
Let's also give it a unique icon.
For
the sample task we will show in these lessons, I will be creating "my
own" version of a preset style and saving it in my own "Ballad" folder.
Let's also give it a unique icon.
I have a preset style that I have renamed by appending a "-j" to the end of the name. It is on my USB drive in the "Ballad" folder. The Tyros3 gives all styles the same "Pro" icon. We want to change that to something else. So, since the icon is part of the file name, the first step os to select the NAME option.
 With
the NAME option selected, the next thing we need to do is to select the file
or the folder that we wish to rename. In this case, there is only one file
visible on the screen so we press [A] to select and highlight that file and
then press the OK button [7B]. The NAME input box appears and I can rename
that file however I want. In this case, however, the name is fine, but I
want to change the icon so I select the ICON option,
which opens up the ICON SELECT display screen.
With
the NAME option selected, the next thing we need to do is to select the file
or the folder that we wish to rename. In this case, there is only one file
visible on the screen so we press [A] to select and highlight that file and
then press the OK button [7B]. The NAME input box appears and I can rename
that file however I want. In this case, however, the name is fine, but I
want to change the icon so I select the ICON option,
which opens up the ICON SELECT display screen.
 In
the Tyros3, there are 18 pages of icons available. (The Tyros5, however, only has 4 pages with a total of 169 icons.) Each page has up to 50
icons. The current icon, the "Pro" icon is located on P18, the
last page, and so that is where the ICON SELECT screen opens up. The [TAB]
buttons are used to move back and forth between the various pages. Unfortunately,
there is no way to jump to a particular page or to move instantly to the
first or last page. That's too bad, because tabbing through all these pages
can take some time!
In
the Tyros3, there are 18 pages of icons available. (The Tyros5, however, only has 4 pages with a total of 169 icons.) Each page has up to 50
icons. The current icon, the "Pro" icon is located on P18, the
last page, and so that is where the ICON SELECT screen opens up. The [TAB]
buttons are used to move back and forth between the various pages. Unfortunately,
there is no way to jump to a particular page or to move instantly to the
first or last page. That's too bad, because tabbing through all these pages
can take some time!
 This
particular style starts off with a RomanceClarinet as
the R1 voice. So, I decide to find an icon of a clarinet and use that. It
doesn't matter what icon you choose; the icons have no effect on the style
playback, only on the visual name of the style. Searching through the pages,
I find some clarinets on page 6. The [3] and [5] buttons can be used to move
the cursor, which indicates the currently selected icon, left and right on
the page. The [4] buttons move the cursor up and down a particular column.
There is a clarinet as the 9th icon on the first row. I move the cursor there
to select it and then press OK.
This
particular style starts off with a RomanceClarinet as
the R1 voice. So, I decide to find an icon of a clarinet and use that. It
doesn't matter what icon you choose; the icons have no effect on the style
playback, only on the visual name of the style. Searching through the pages,
I find some clarinets on page 6. The [3] and [5] buttons can be used to move
the cursor, which indicates the currently selected icon, left and right on
the page. The [4] buttons move the cursor up and down a particular column.
There is a clarinet as the 9th icon on the first row. I move the cursor there
to select it and then press OK.
 This
takes me back to the NAME input screen. I can see that the icon has changed
in the NAME input box. I can, at this point, continue with the renaming and
change the style name or go back and find a different icon or CANCEL the
whole process.
This
takes me back to the NAME input screen. I can see that the icon has changed
in the NAME input box. I can, at this point, continue with the renaming and
change the style name or go back and find a different icon or CANCEL the
whole process.
But, if I like the selected icon and the current name, I would press the OK button to make the change permanent.
 Now,
we see that the name listed in the STYLE display screen has the new selected
clarinet icon. If you select this style and return to the MAIN screen, the
icon would also be displayed on that screen right next to the style name.
Now,
we see that the name listed in the STYLE display screen has the new selected
clarinet icon. If you select this style and return to the MAIN screen, the
icon would also be displayed on that screen right next to the style name.
If you were to view this file on your USB drive in your computer, you would see the name as "DreamyBallad-j.S248.STY". The icon is represented by the ".S248" part of the name. If you wanted to add this icon to a whole batch of files, it would be far easier to simply edit the names on your PC and add the ".S248" between the file name and the file type (".STY"). While it is useful to be able to add icons using the ICON SELECT screen, having to tab between those 18 pages makes the task relatively arduous.
Well, now that you know all about naming a file, in the next lesson we explore one of the unique STYLE display options that provides an alternative way to view file directories.
This page updated on February 15, 2024 .